Connecting GCP to on-premises with a VPN
by Oleg Korol, Senior Software Engineer and Cloud Architect
Introduction
In this article, we'll walk through the process of setting up a secure VPN connection between Google Cloud Platform (GCP) and an on-premises network. This setup is crucial for organizations that want to leverage cloud resources while maintaining secure access to their existing on-premises infrastructure.
By establishing this VPN connection, we create a hybrid cloud environment that allows for seamless and secure communication between cloud-based and on-premises resources. This approach not only enhances security but also provides flexibility in resource management and data access across both environments.
The end result will look like this:
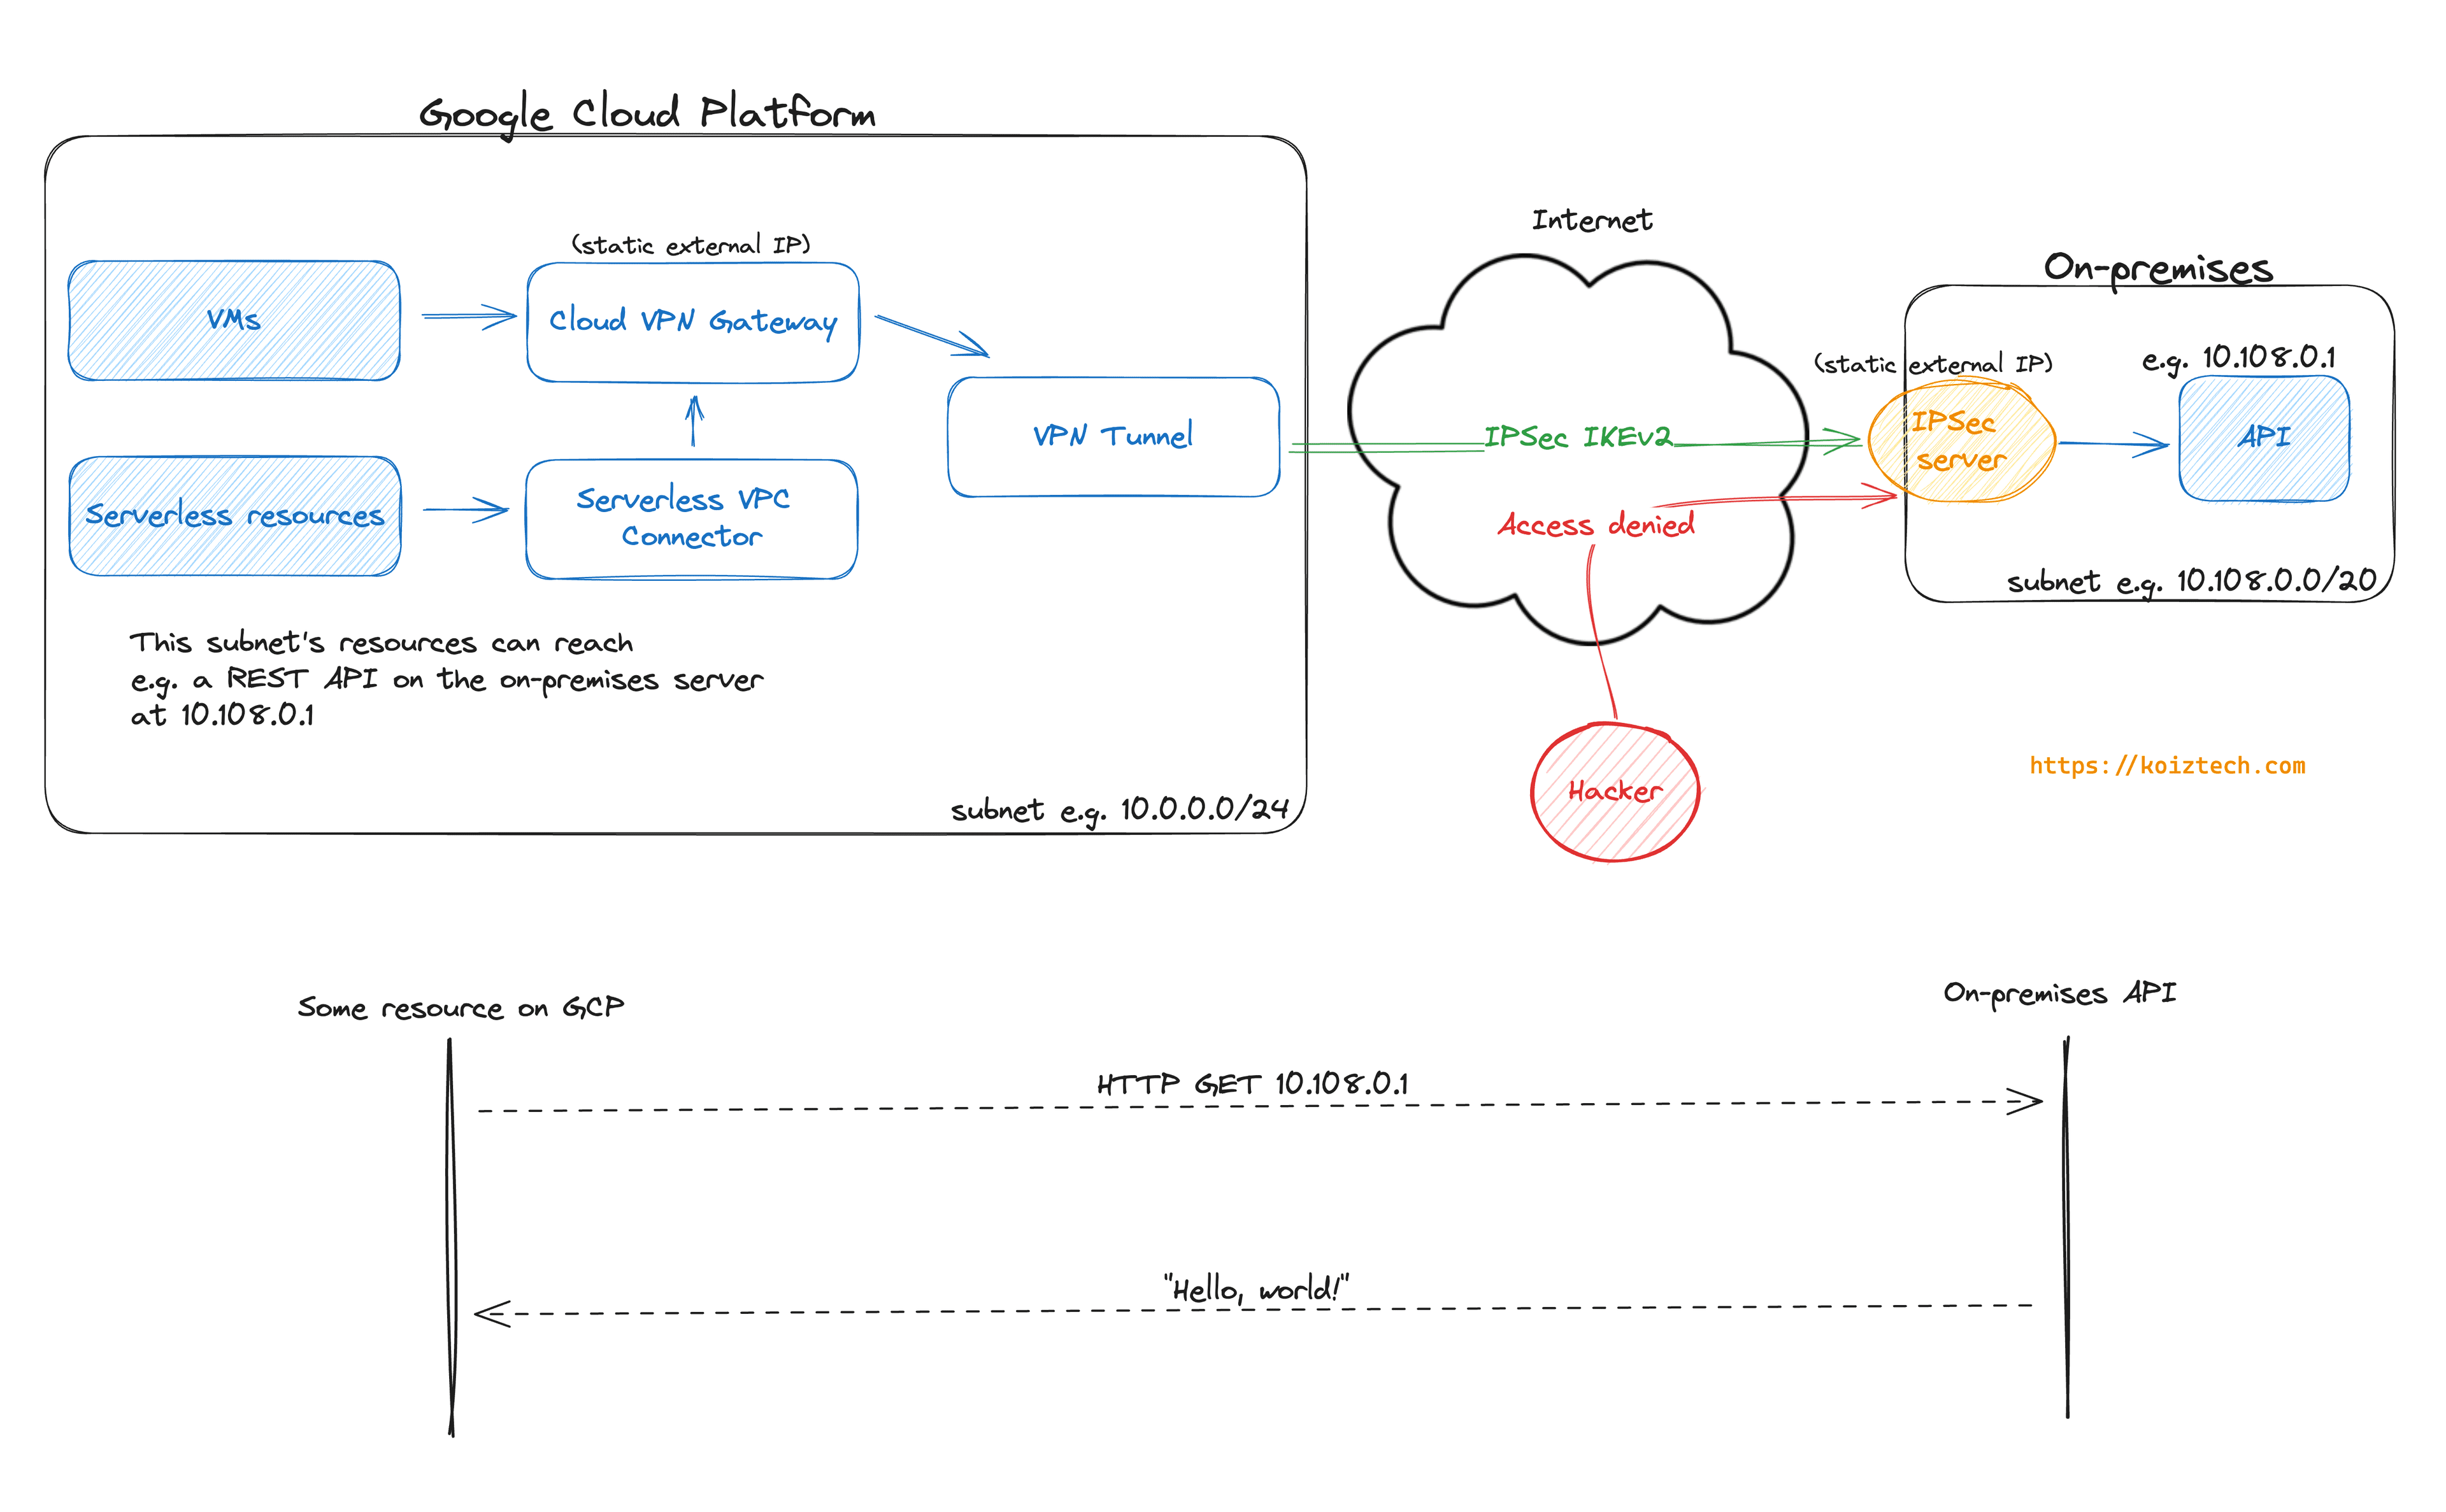
To simplify things a little bit, we're going to fake the on-premises server with a VM on DigitalOcean.
Note
Although we are using GCP (and DigitalOcean) as an example, you can follow the same approach to connect other cloud providers like AWS or Azure to your on-premises network.
What you'll need
- A Google Cloud Platform account
- A DigitalOcean account
Get started
First, we're going to create a new VPC and subnet on GCP. When we finish, all the resources wihin this VPC will have direct access to the on-premises server.
Create VPC and subnet (GCP)
Note
Feel free to name your VPC as you wish and select a region for the subnet that best suits your use-case. You can also chose another internal IP range of the subnet. This is up to you. Check valid IPV4 ranges here
- Let's head over to "VPC Networks" create a VPC. We'll name it
vpn. - This VPC will have only one subnet, which we'll name
vpn-europe-west3and selecteurope-west3as region. - The subnet's IPv4 range is going to be
10.0.0.0/24. - Set
hybrid subnetto "On", which means:
"Allowing hybrid subnet modifies the VPC network routing behaviour to allow overlap between the subnet's IP address range and those of custom dynamic routes." - We are going to allow all the ingress Firewall rules that are proposed, and edit the
vpn-allow-customrule to allow ESP, UDP 500 and UDP 4500: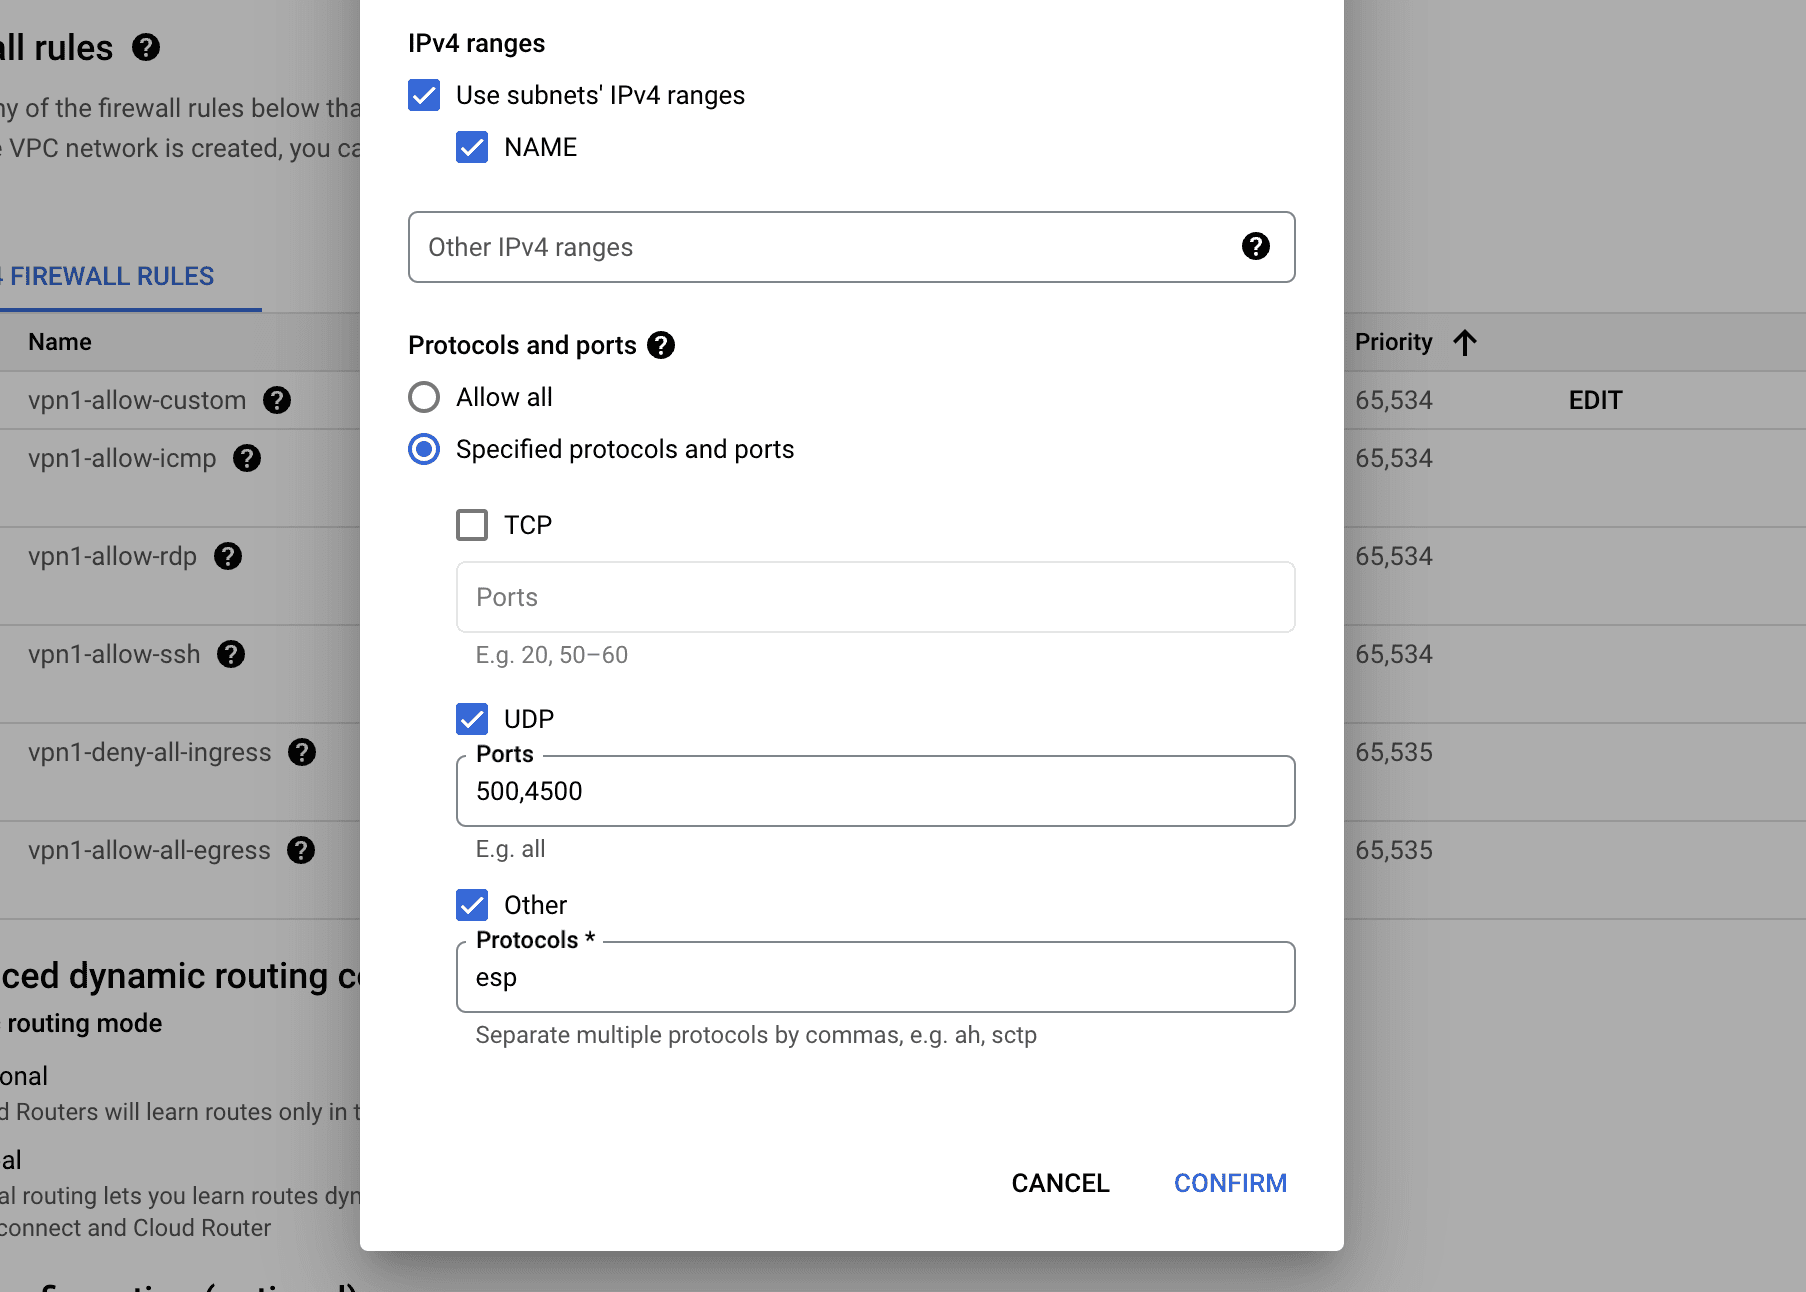
- Set
dynamic routing modeto "global". - Leave everything else as is and click "Create".
Now we should have a new VPC with a subnet.
Create a Cloud VPN Gateway
Now we are going to create a VPN Gateway, which is going to help us to establish the connection between GCP and on-premises.
Top tip
The VPN Gateway has to be on the same region as the subnet we created above.
- We'll head over to "VPN" and then click on "VPN Setup Wizard".
- Select "classic VPN".
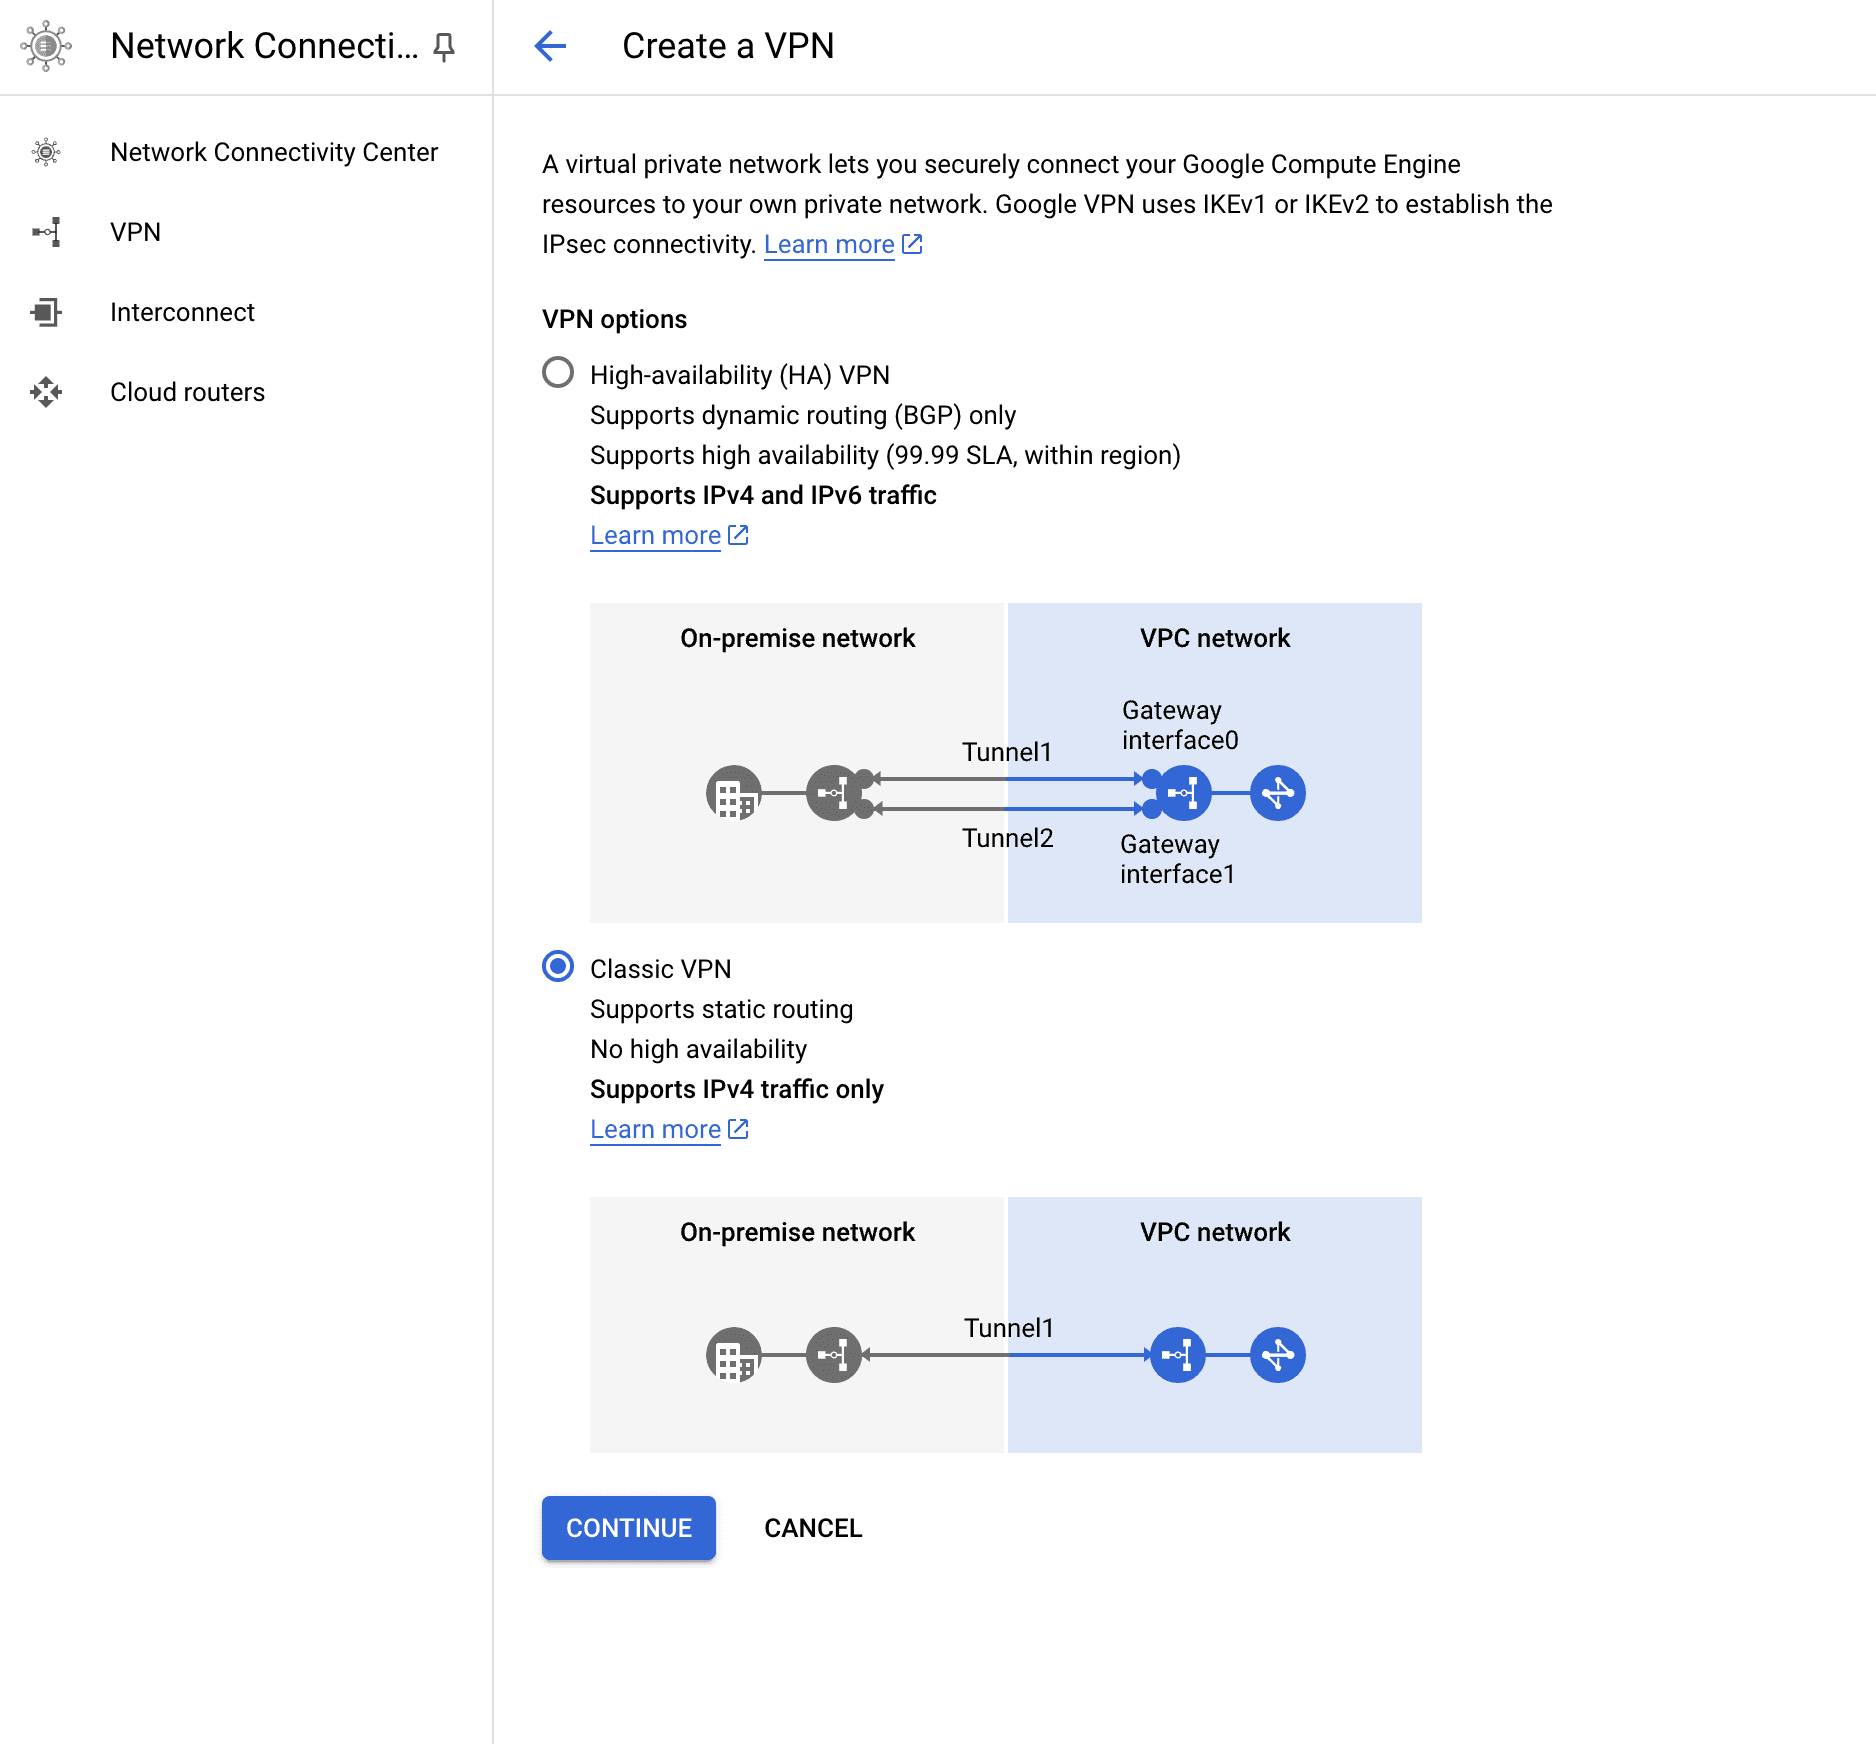
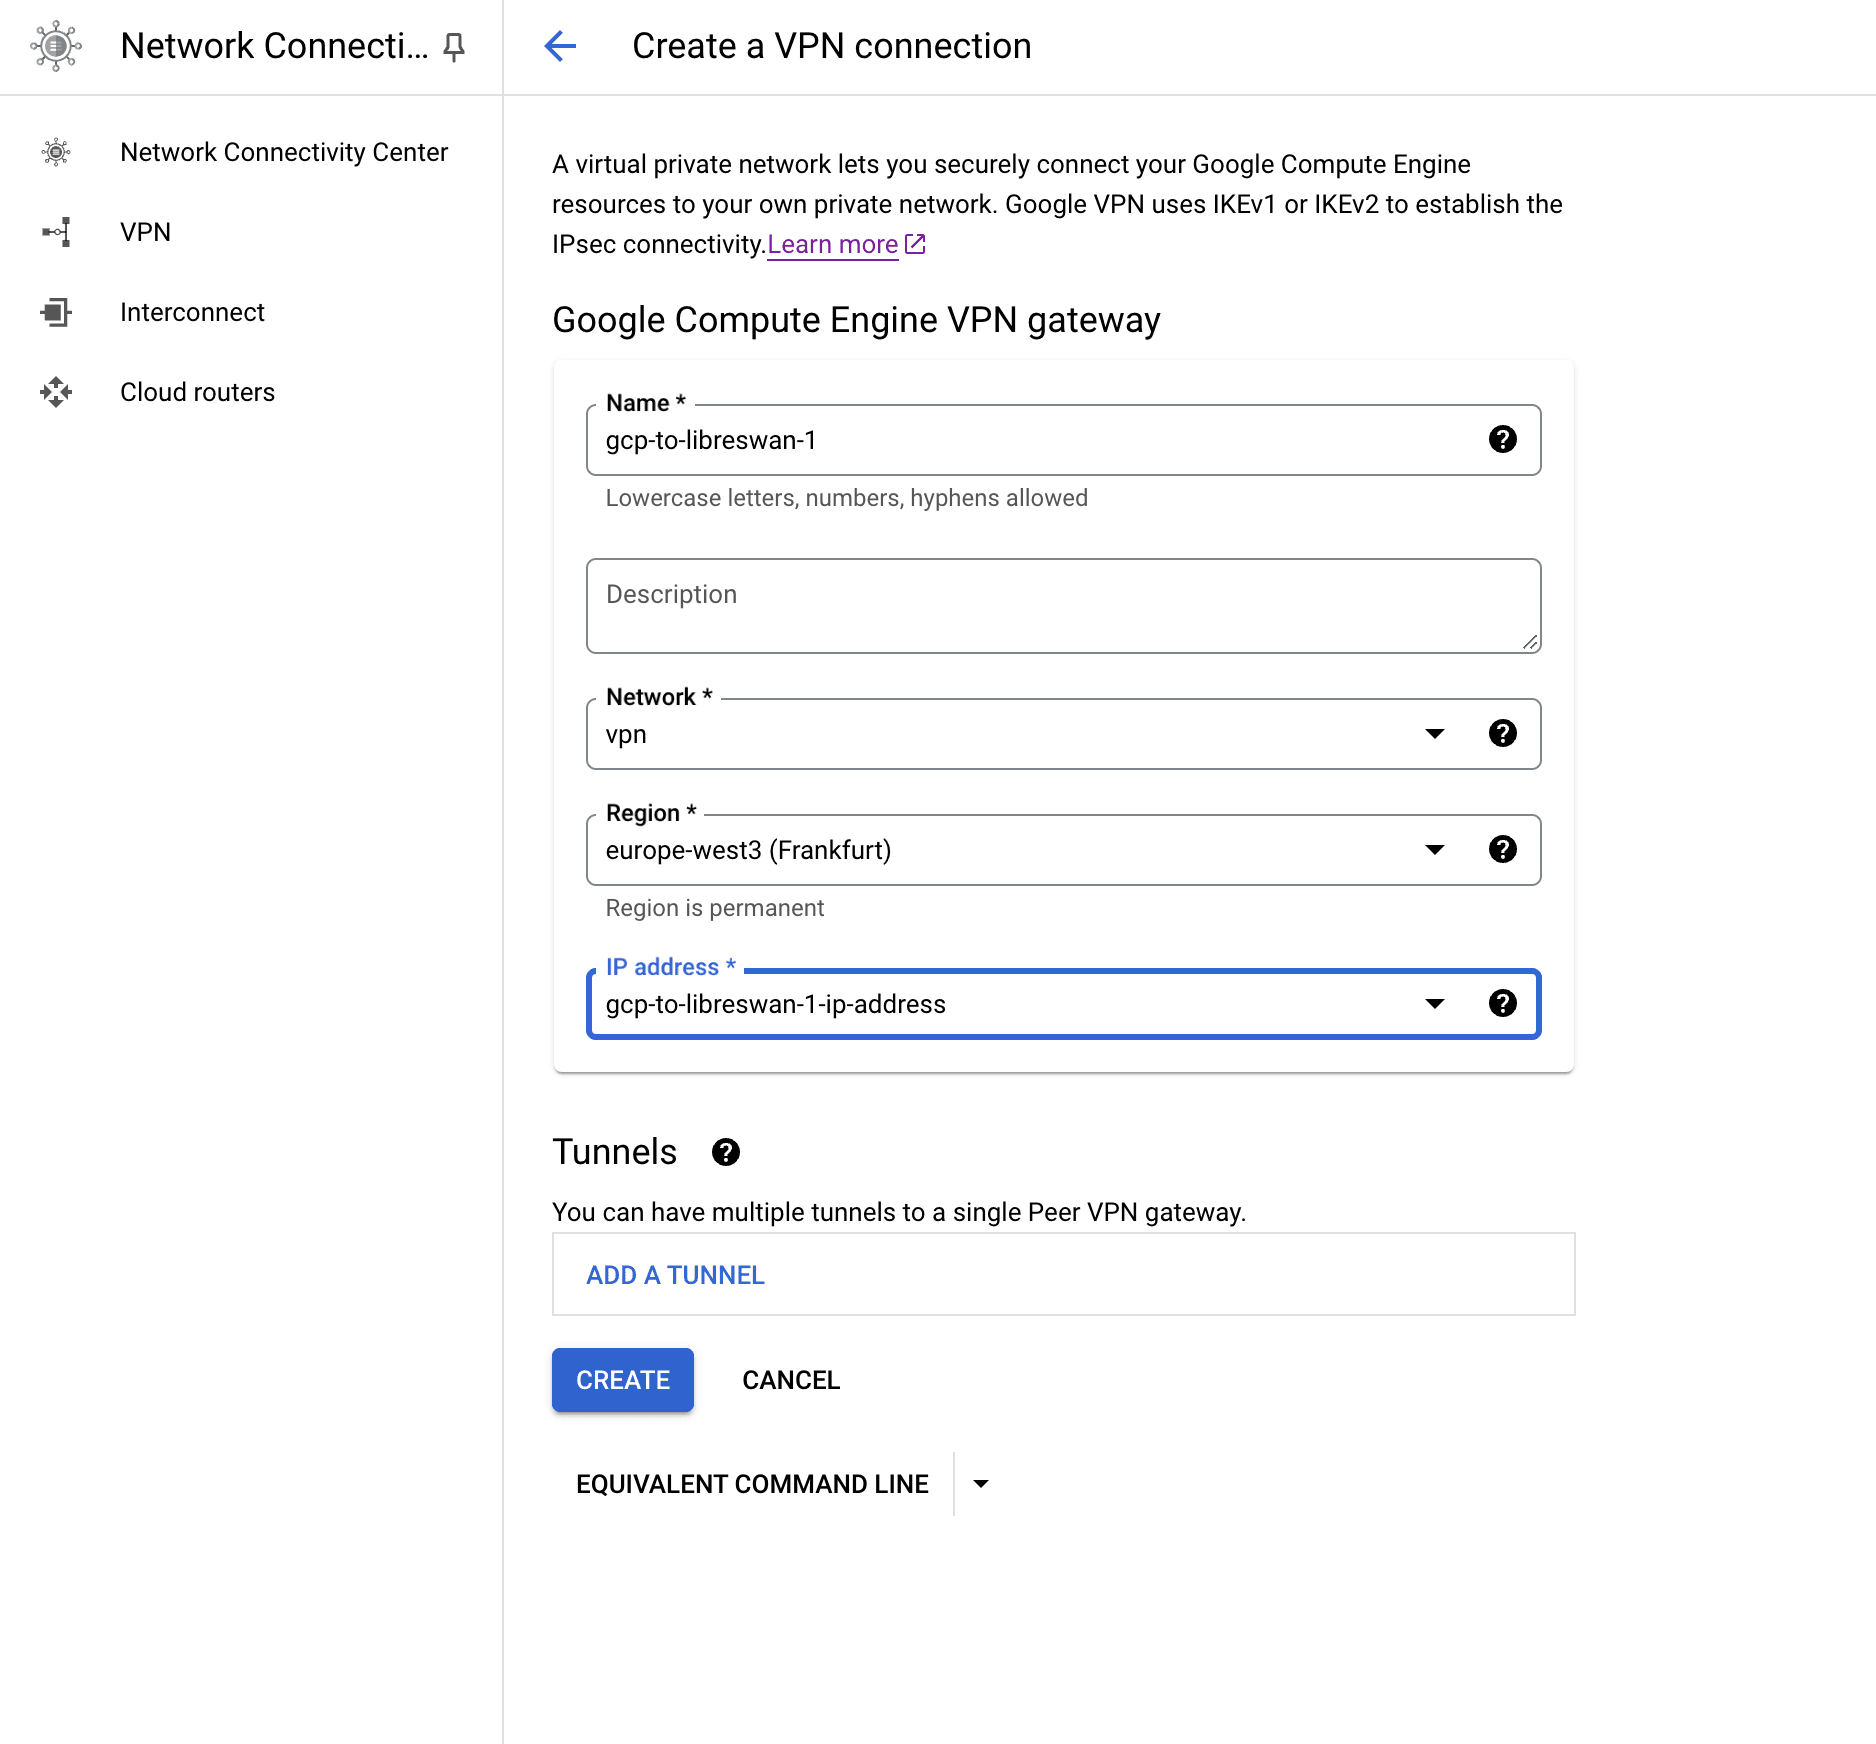
- Name the VPN Gateway as you please. We used
gcp-to-libreswan-1. - Set
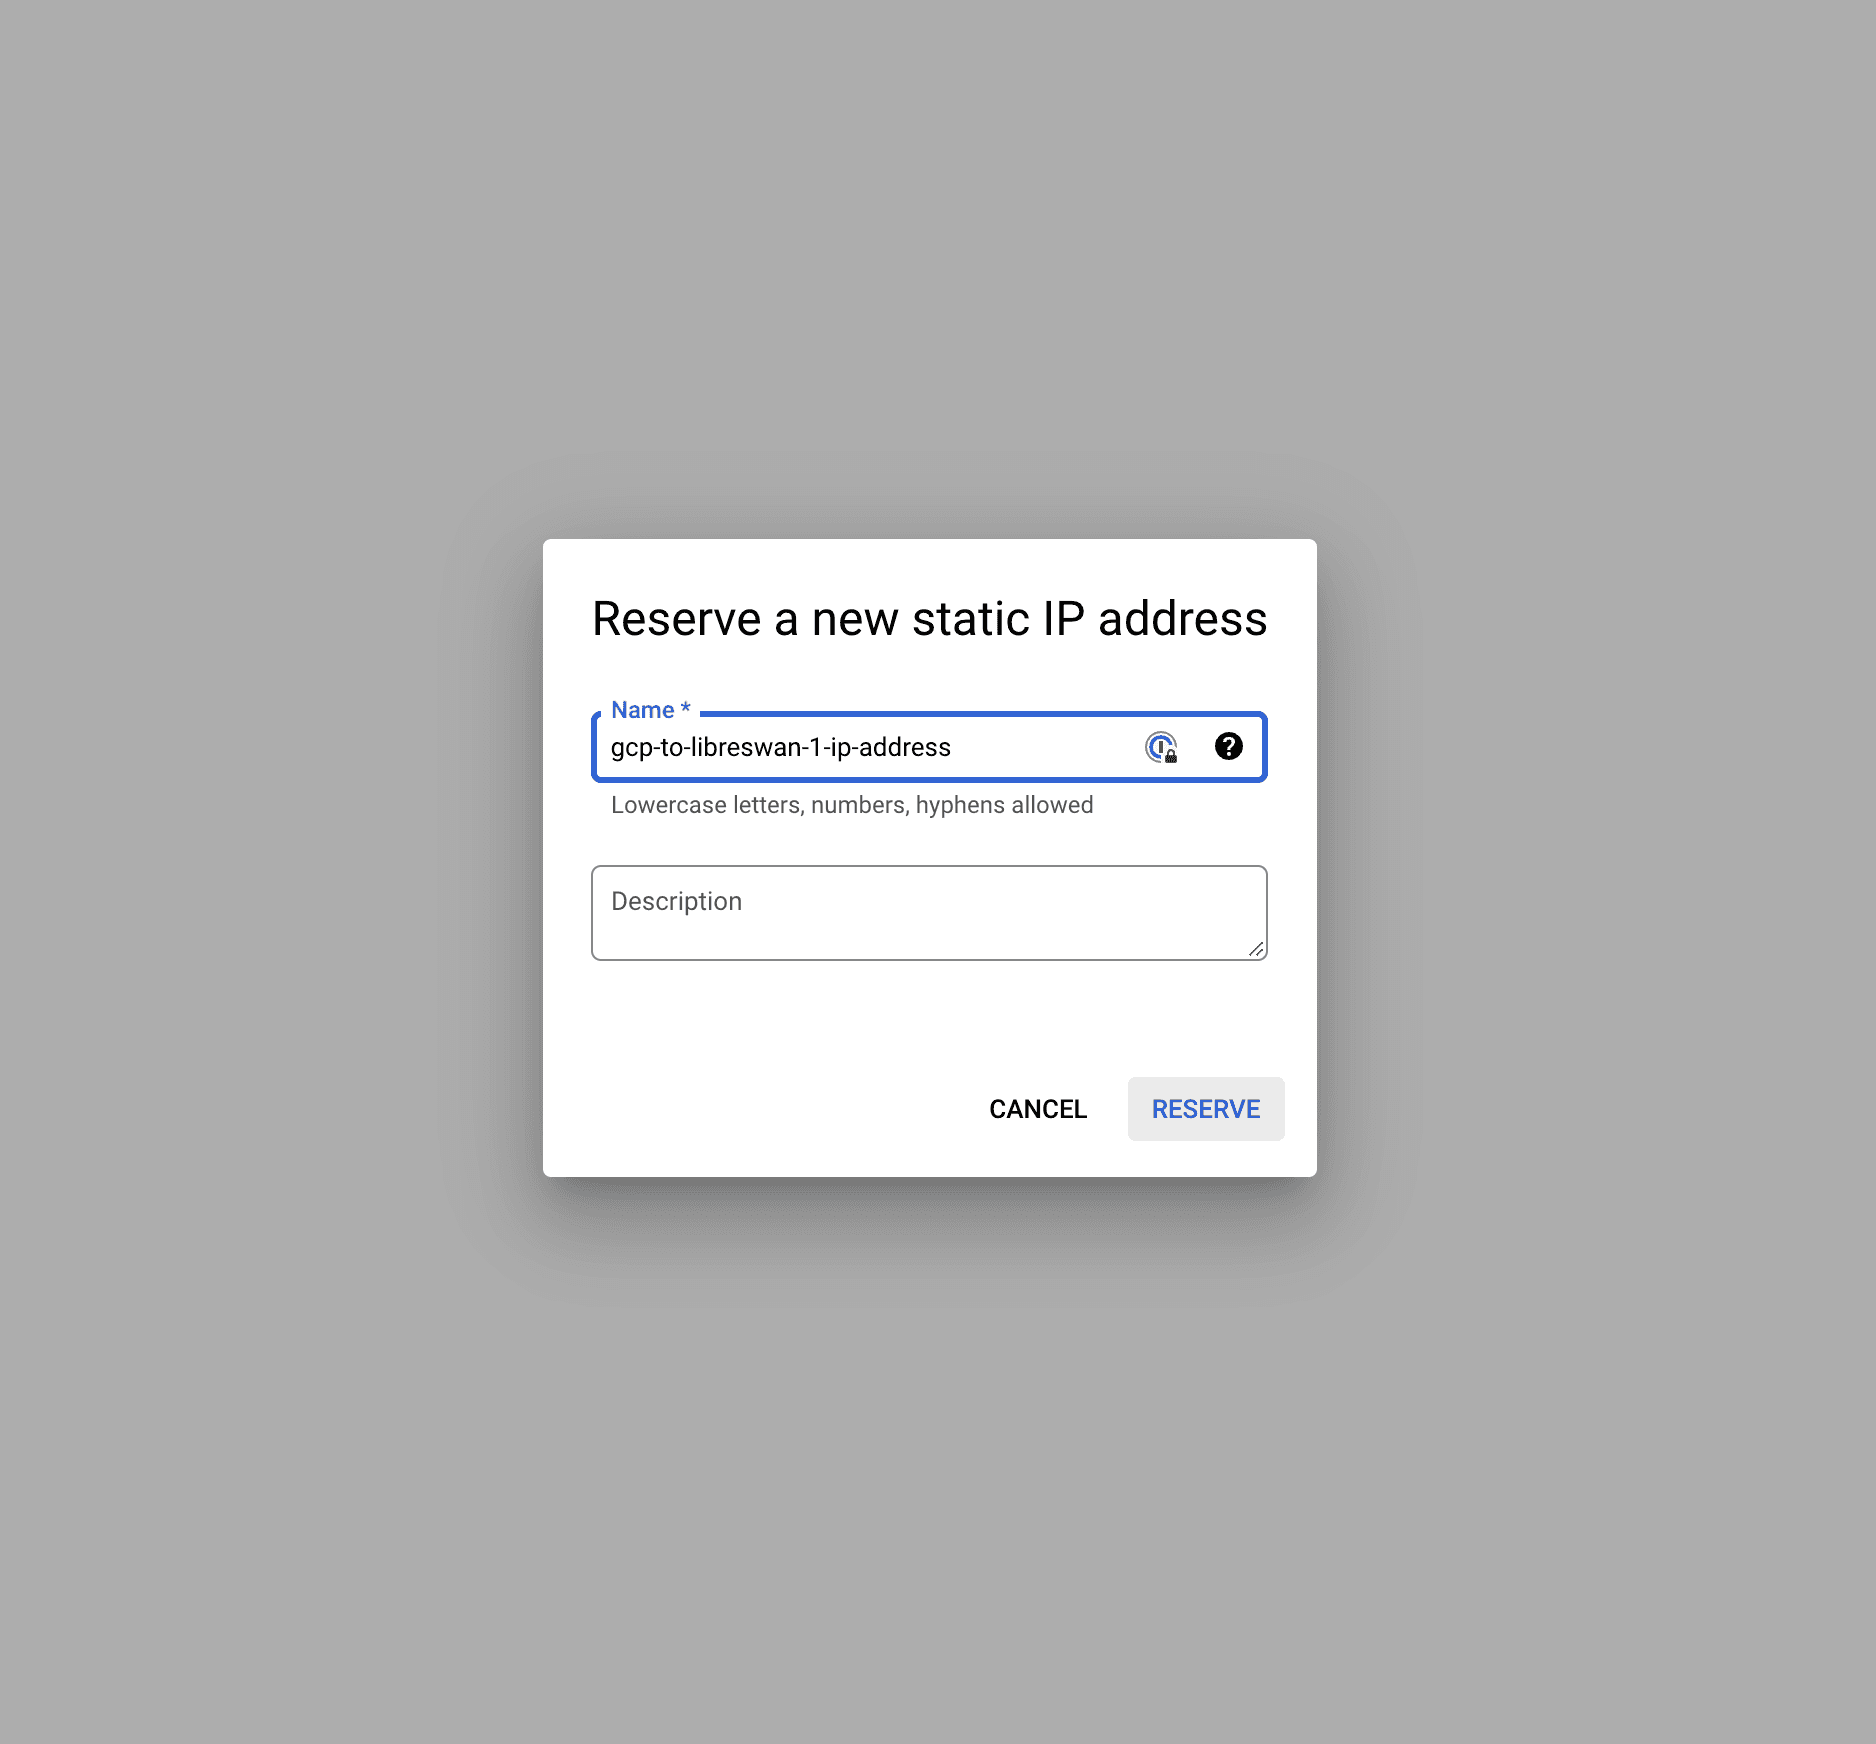
Networkto the new VPC we created before,vpn. The region is going to be the one of the subnet we created before,europe-west3. - We'll need a static external address. We click on "IP Address" and then "Create IP Address"
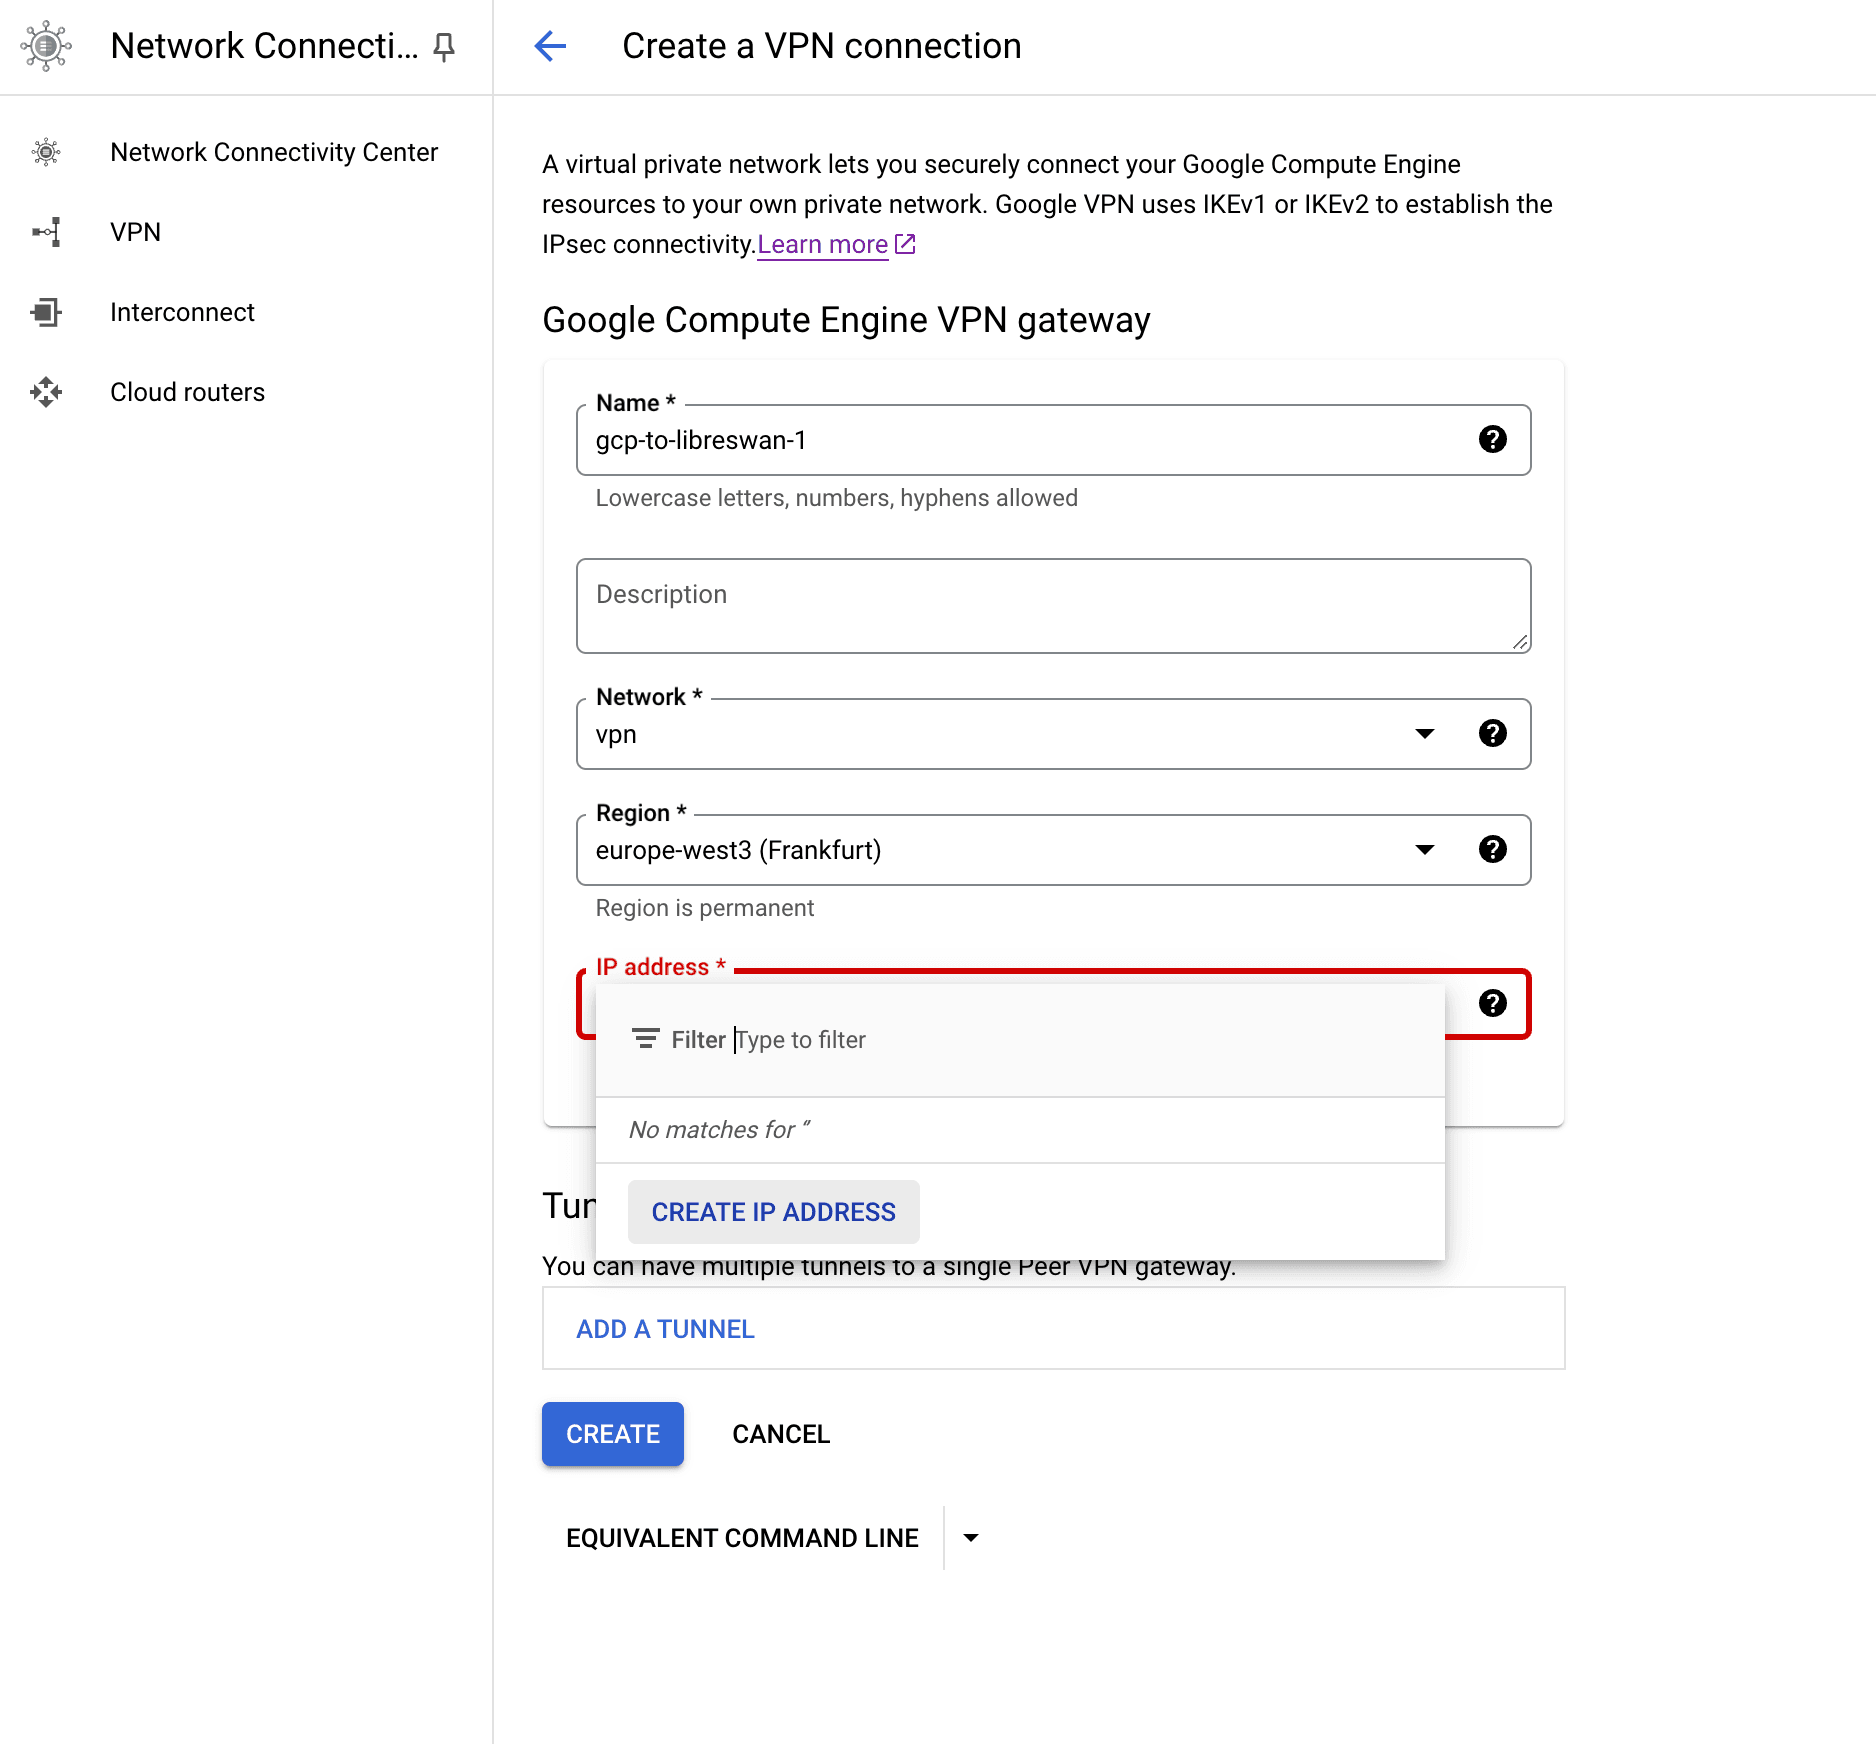
- Remove the VPN Tunnel for now (click on the bin icon). We'll create one later.
On-premises setup
In this part, we're gong to prepare our on-premises server.
In this example, we're faking on-remises with a VM on Digital Ocean. So we'll need to create a VM (droplet) there first.
Once your VM is up and running, we'll run a script that "sets up your own IPsec VPN server in just a few minutes, with IPsec/L2TP, Cisco IPsec and IKEv2", which uses Libreswan as the IPSec server.
- SSH into your machine and start by updating the dependencies:
sudo apt update && sudo apt upgrade- Then let's download the script we need:
wget https://get.vpnsetup.net -O vpn.sh- (Option 1 - the simplest way) Run the script:
# Allow the script to execute
sudo chmod +x vpn.sh
# Run the script
sudo sh vpn.sh- (Option 2 - recommended) Run the script with custom parameters:
# Generate a strong pre-shared key
# This is going to be 'your_ipsec_pre_shared_key' in the next step
# (!) Note: save this key for later
openssl rand --base64 64

# All values MUST be placed inside 'single quotes'
# DO NOT use these special characters within values: \ " '
wget https://get.vpnsetup.net -O vpn.sh
sudo VPN_IPSEC_PSK='your_ipsec_pre_shared_key' \
VPN_USER='a_random_vpn_username' \
VPN_PASSWORD='a_random_vpn_password' \
sh vpn.sh- Then we'll make a backup of the "original" IPSec config file that has just been created:
mv /etc/ipsec.conf{,.original}- And we are going to use our own configuration, as suggested here (replacing
xxxwith the right addresses):
sudo vi /etc/ipsec.confContent for ipsec.conf:
config setup
  protostack=netkey

conn mysubnet
  also=mytunnel
  leftsubnet=xxx # IP range of the *on-premises* subnet (e.g. 10.108.0.0/20)
  rightsubnet=xxx # " of GCP's subnet (e.g. 10.0.0.0/24)
  auto=start

conn mytunnel
  left=xxx # the external IP of *this* server
  right=xxx # the external IP of GCP's Cloud VPN Gateway
  authby=secret
Top tip
You can find the IP range of the on-premises subnet by either running ifconfig within the VM, or checking the "Networking" tab of your droplet (look for "VPC IP RANGE").
- Then restart the IPSec VPN server:
sudo ipsec restartBack to GCP
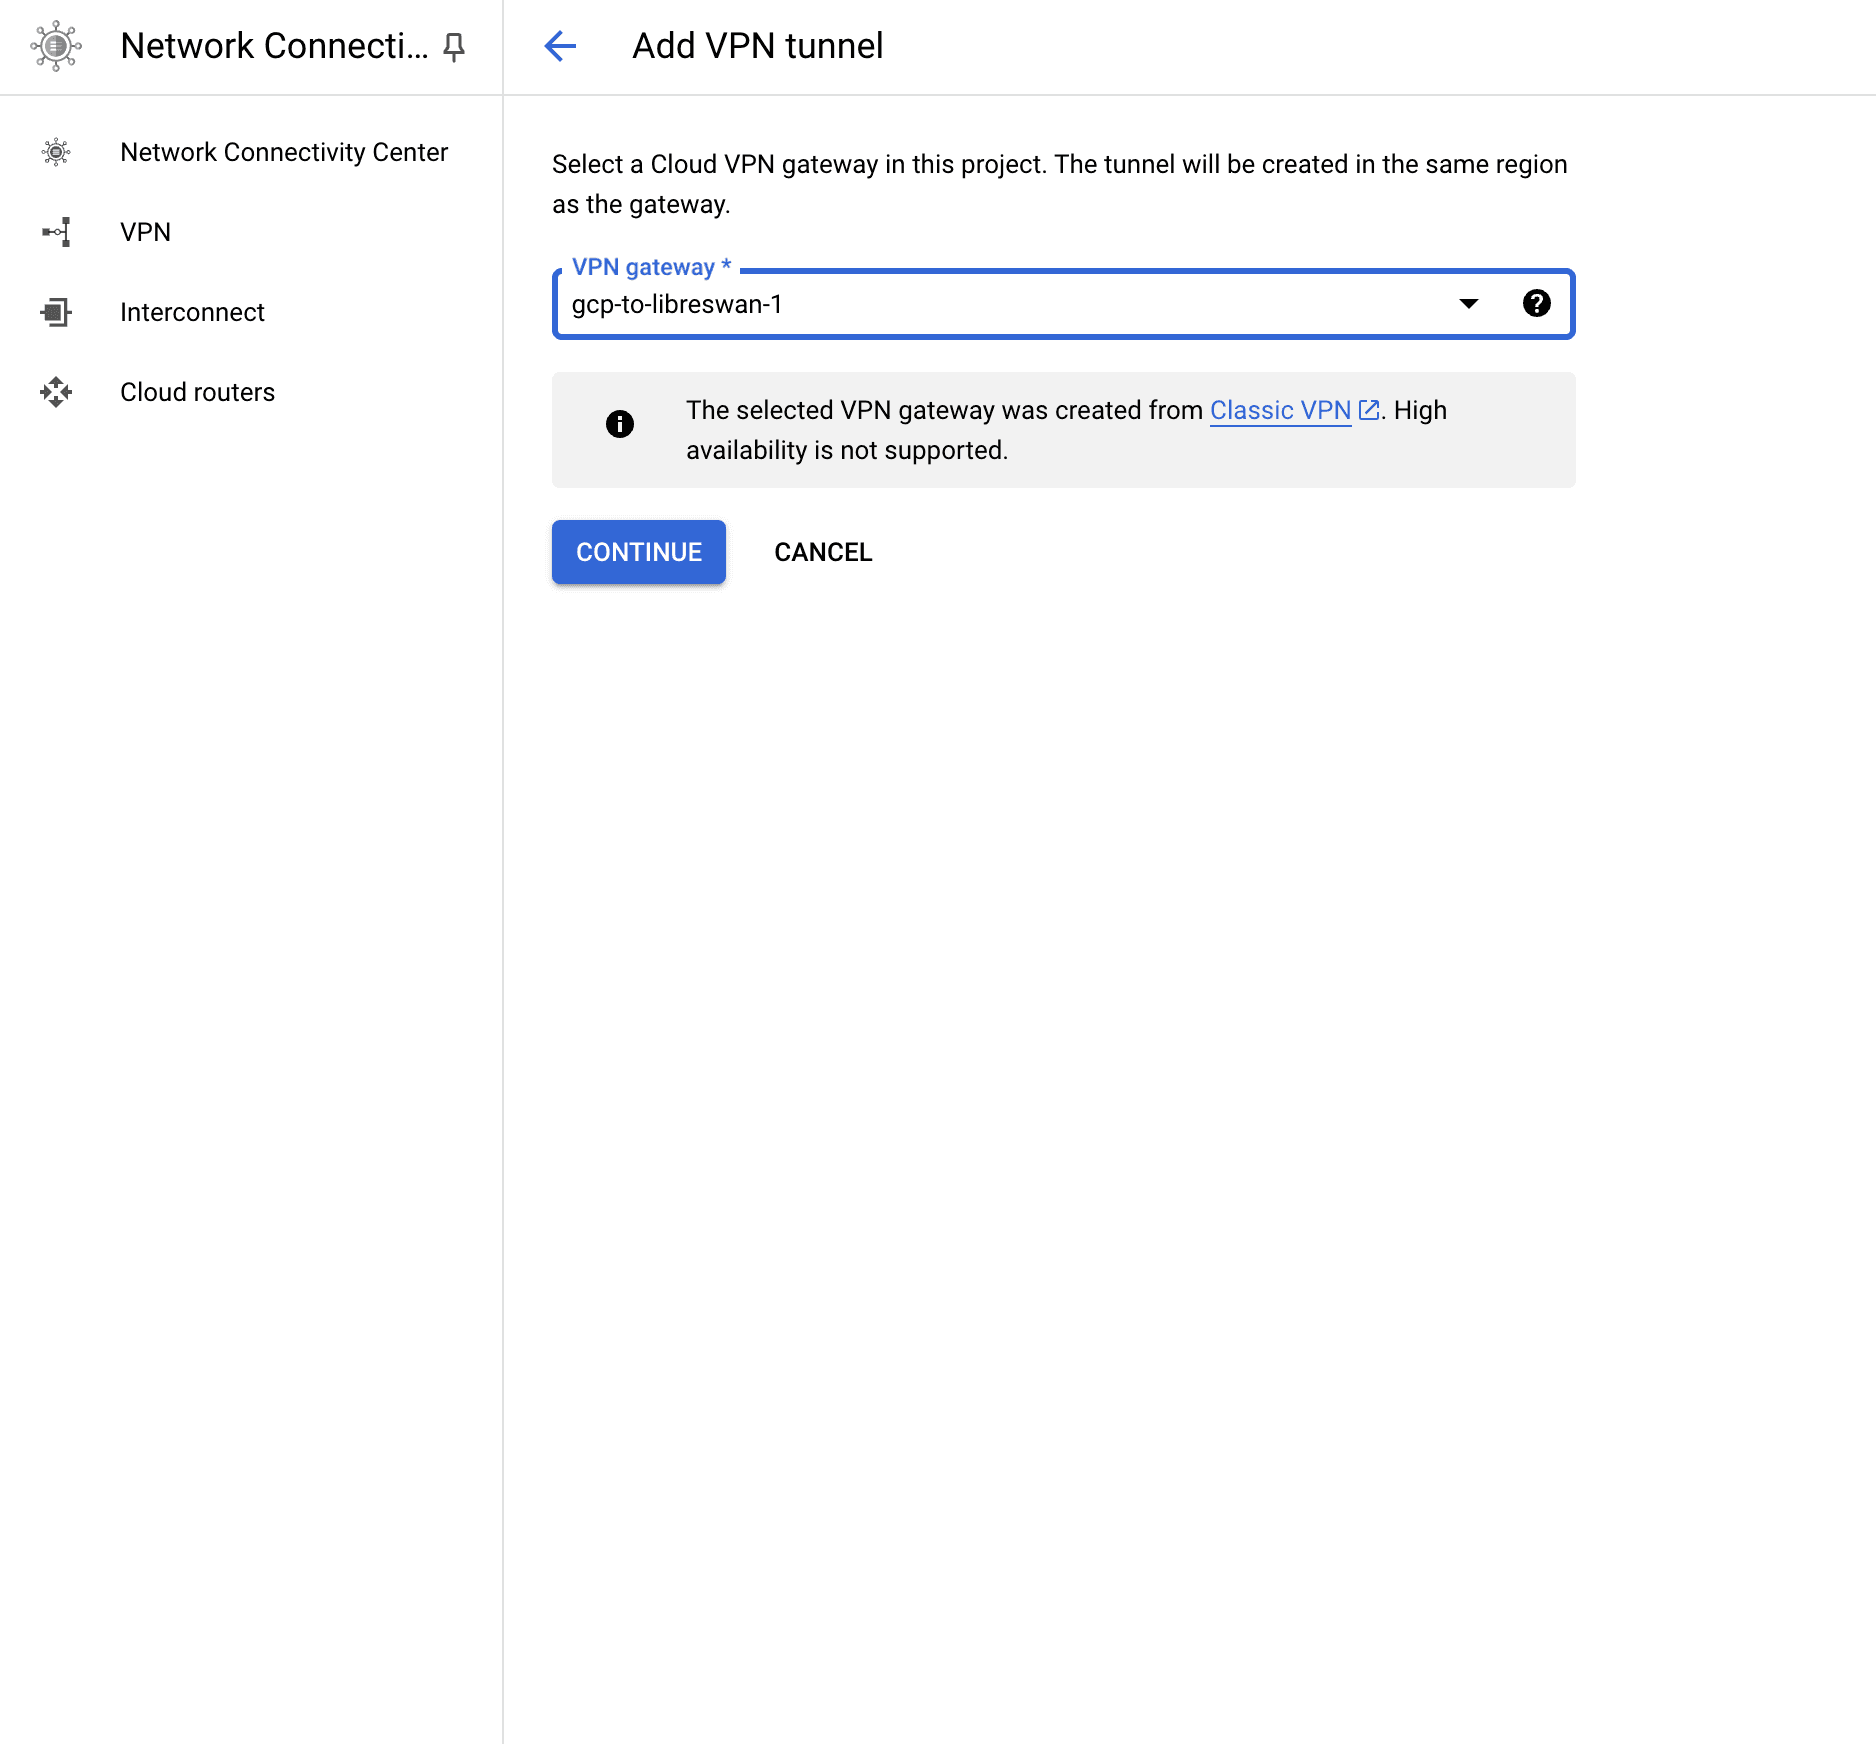
So before we already created a VPN Gateway for our GCP project. Bu remember we said that we would create a Tunnel later? Now is the right time.
Create a Cloud VPN Tunnel
The VPN Tunnel is the service that will actually connect our two networks. To create one, you'll have to:
- Go to "VPN" and select the "VPN Gateway" that we created before.
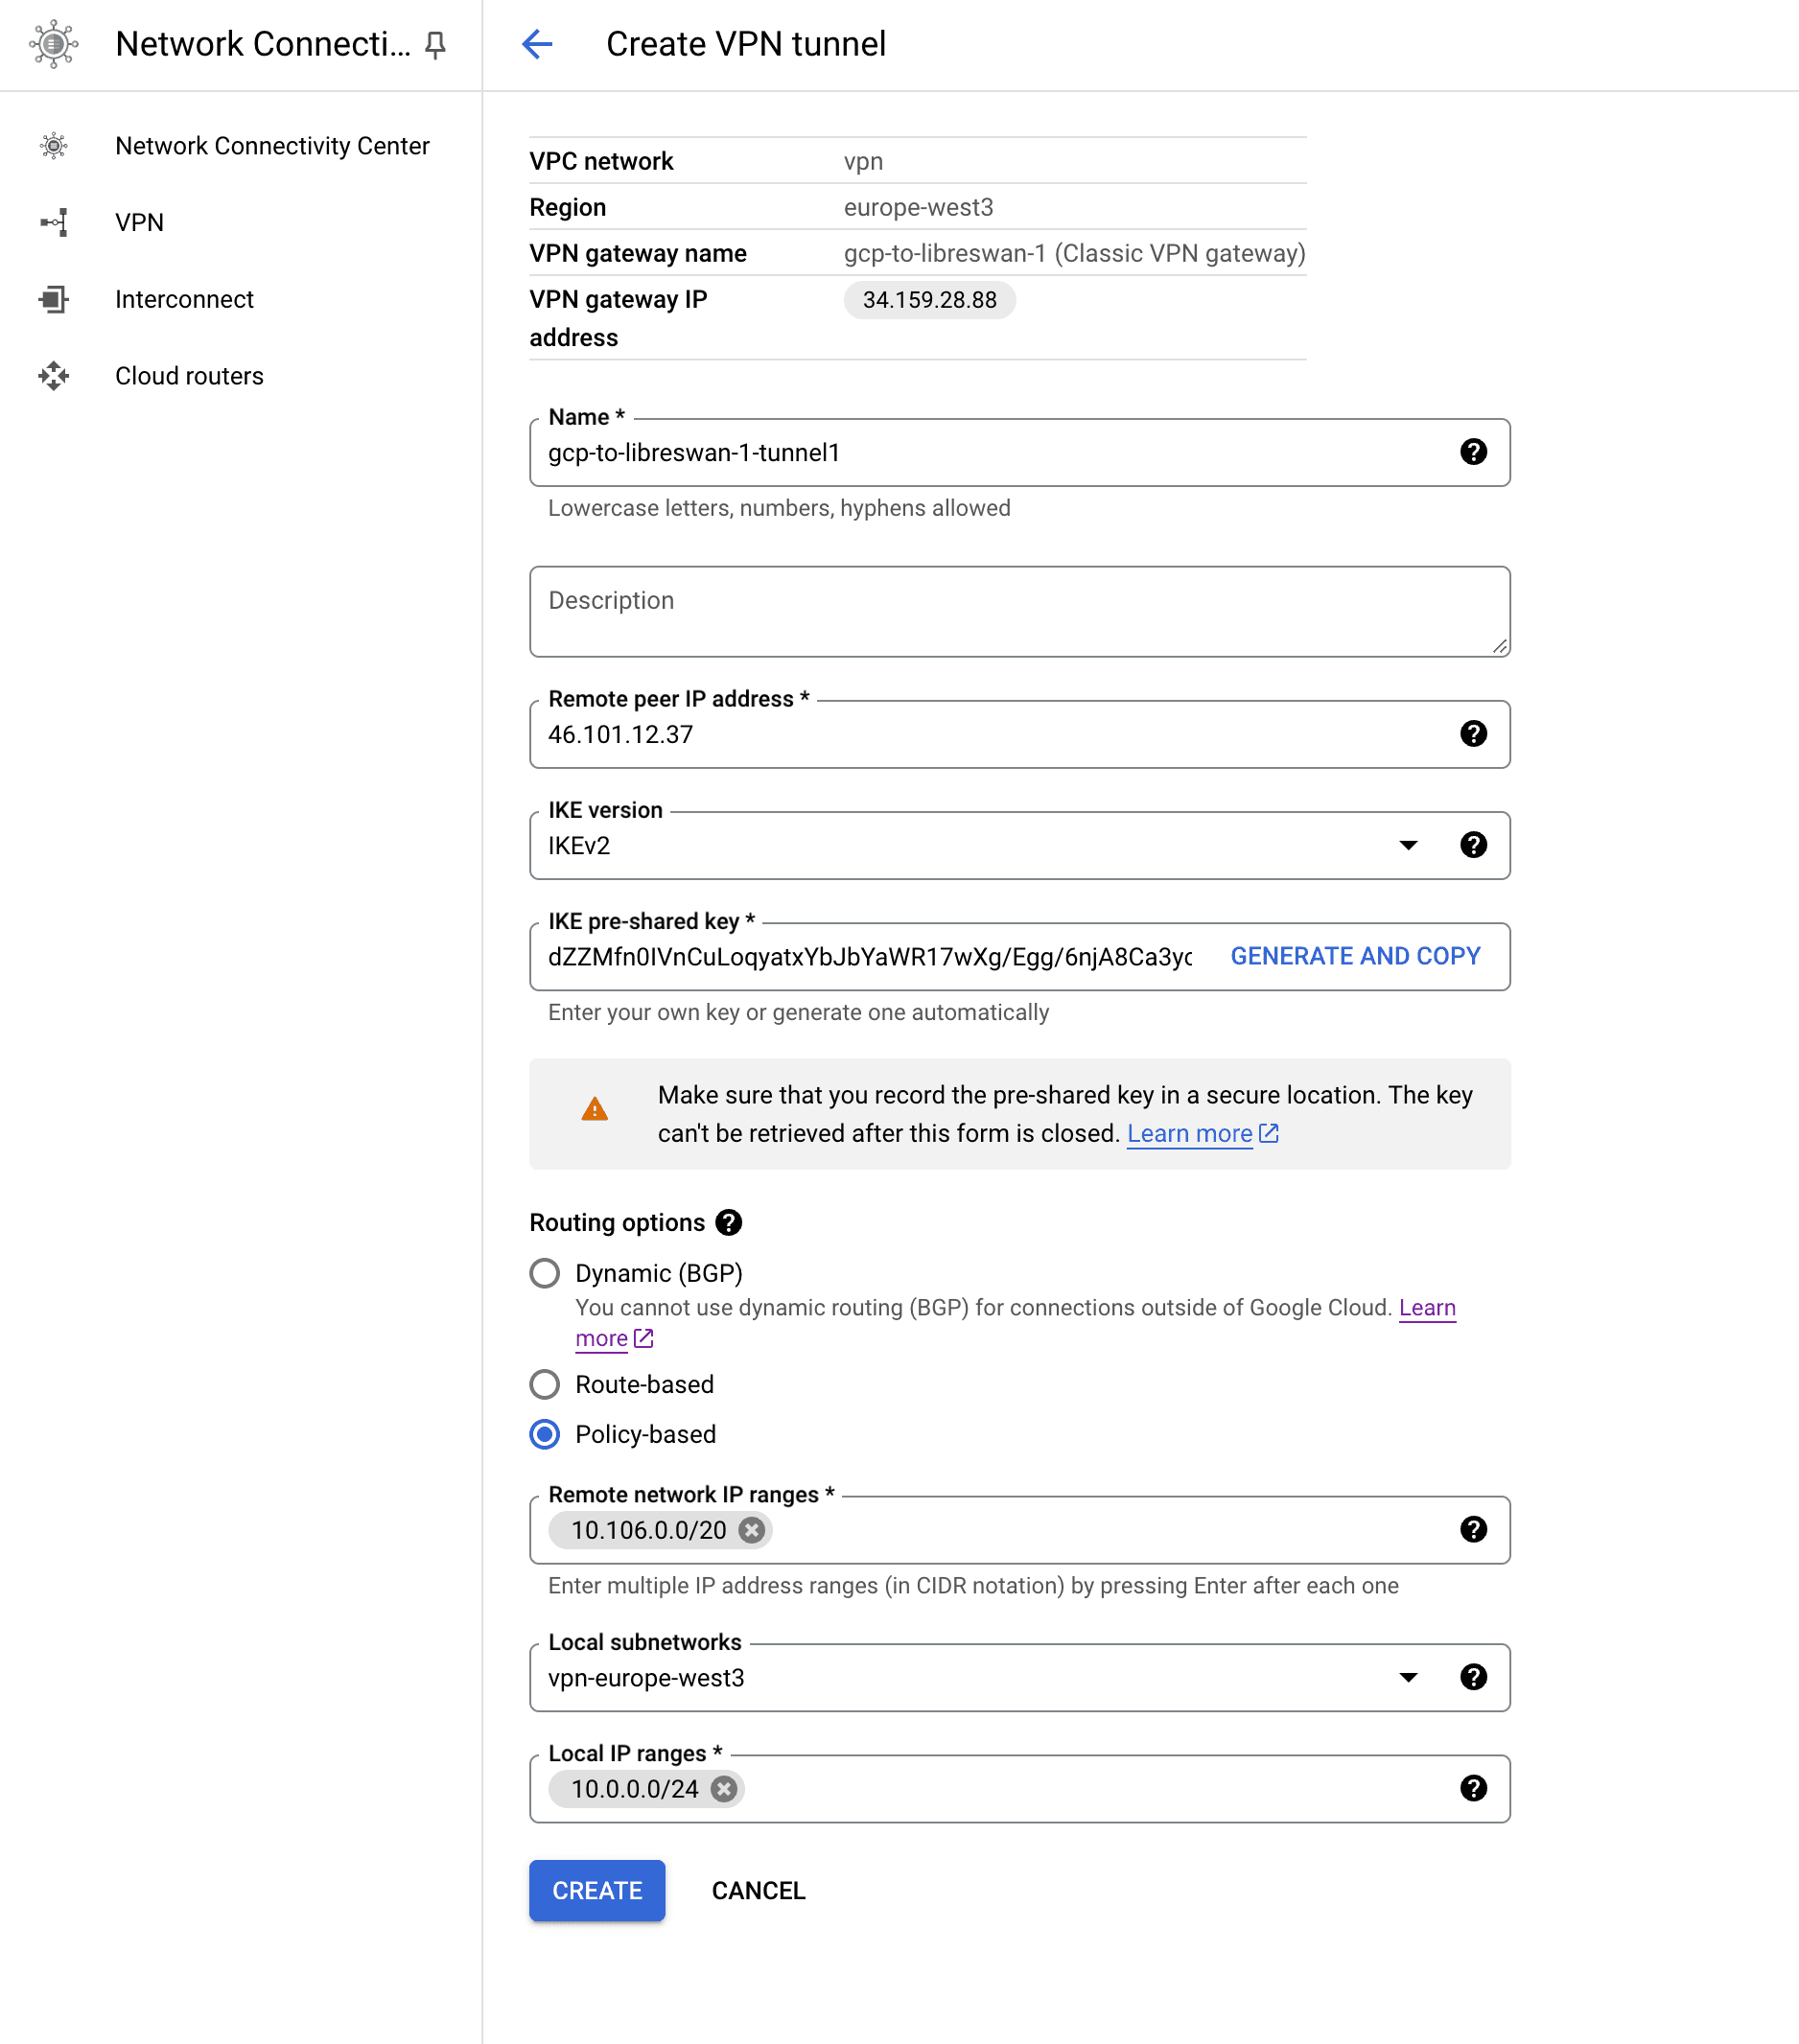
- The "Remote peer IP address" is going to be the external IP of DigitalOcean's VM (droplet).
- Select "IKEv2".
- The IKE PSK is the one that the script
vpn.shcreated for us (or we created withopenssl). We referred to it as "your_ipsec_pre_shared_key". - Routing is going to be policy-based. We are going to set the internal IP range to the one from DigitalOcean's VM and our local subnet.
Note
If you plan to use a Serverless VPC Connector, it is recommended to add its (future) IP range to the tunnel now (usually e.g. 10.1.0.0/28) to the remote network IP ranges. Otherwise, you will need to remove and create this tunnel again.
Back to "on-premises"
What we will be testing now is how we can call a Node.js API running on-premises (DigitalOcean in this example) from Google Cloud Platform.
Run a sample API in the local network
Here's a simple "hello world" Node.js API in a single file (server.js) that runs on hostname 0.0.0.0 (important - see comments in code):
const http = require('http');
// This hostname is important. If you leave it out, your API will run on 127.0.0.1 (aka. localhost)
// and you'll not be able to call the API using the API address.
const hostname = '0.0.0.0';
const port = 3000;

const server = http.createServer((req, res) => {
  res.statusCode = 200;
  res.setHeader('Content-Type', 'text/plain');
  res.end('Hello, World!\n');
});

server.listen(port, hostname, () => {
  console.log(`Server running at http://${hostname}:${port}/`);
});
You'll - of course - need Node.js installed to run the script above:
apt install nodejs npmTo run the API as a background process, you can use a process manager like PM2. Here's how you can do it:
- Install PM2 globally using npm:
npm install pm2 -g- Start the Node.js API using PM2.
This command will start theserver.jsfile as a background process managed by PM2:
pm2 start server.jsTo stop the background process, you can use:
pm2 stop server.jsOr, if you want to delete the process from PM2's list altogether:
pm2 delete server.jsWith PM2, your Node.js API will run as a background process, and you don't need to neither keep the command running in the foreground network start the process all the time. PM2 also provides additional features like process monitoring, automatic restarts, and logging.
That's it!
Now we should be able to call the new API we just created from GCP, e.g.:
curl 10.106.0.2:3000And we should get a "Hello, World!" string back.
Note
If you are not planning to use serverless services, you can skip this part entirely and stop here.
If you do, continue with the next part.
What about serverless?
So far we were able to access the local network's resources from a VM in the same subnet as the VPC Gateway. But what if we want to to do from a serverless compute resource (e.g. cloud functions, CloudRun)?
This will not work straightaway, because serverless resources are not attached to a specifiv VPC/subnet.
So what now? No problem, there is a solution for this.
Serverless VPC Connector
If we want our serverless resources to access the on-premises resources, we need to set up an additional service, a Serverless VPC Connector:
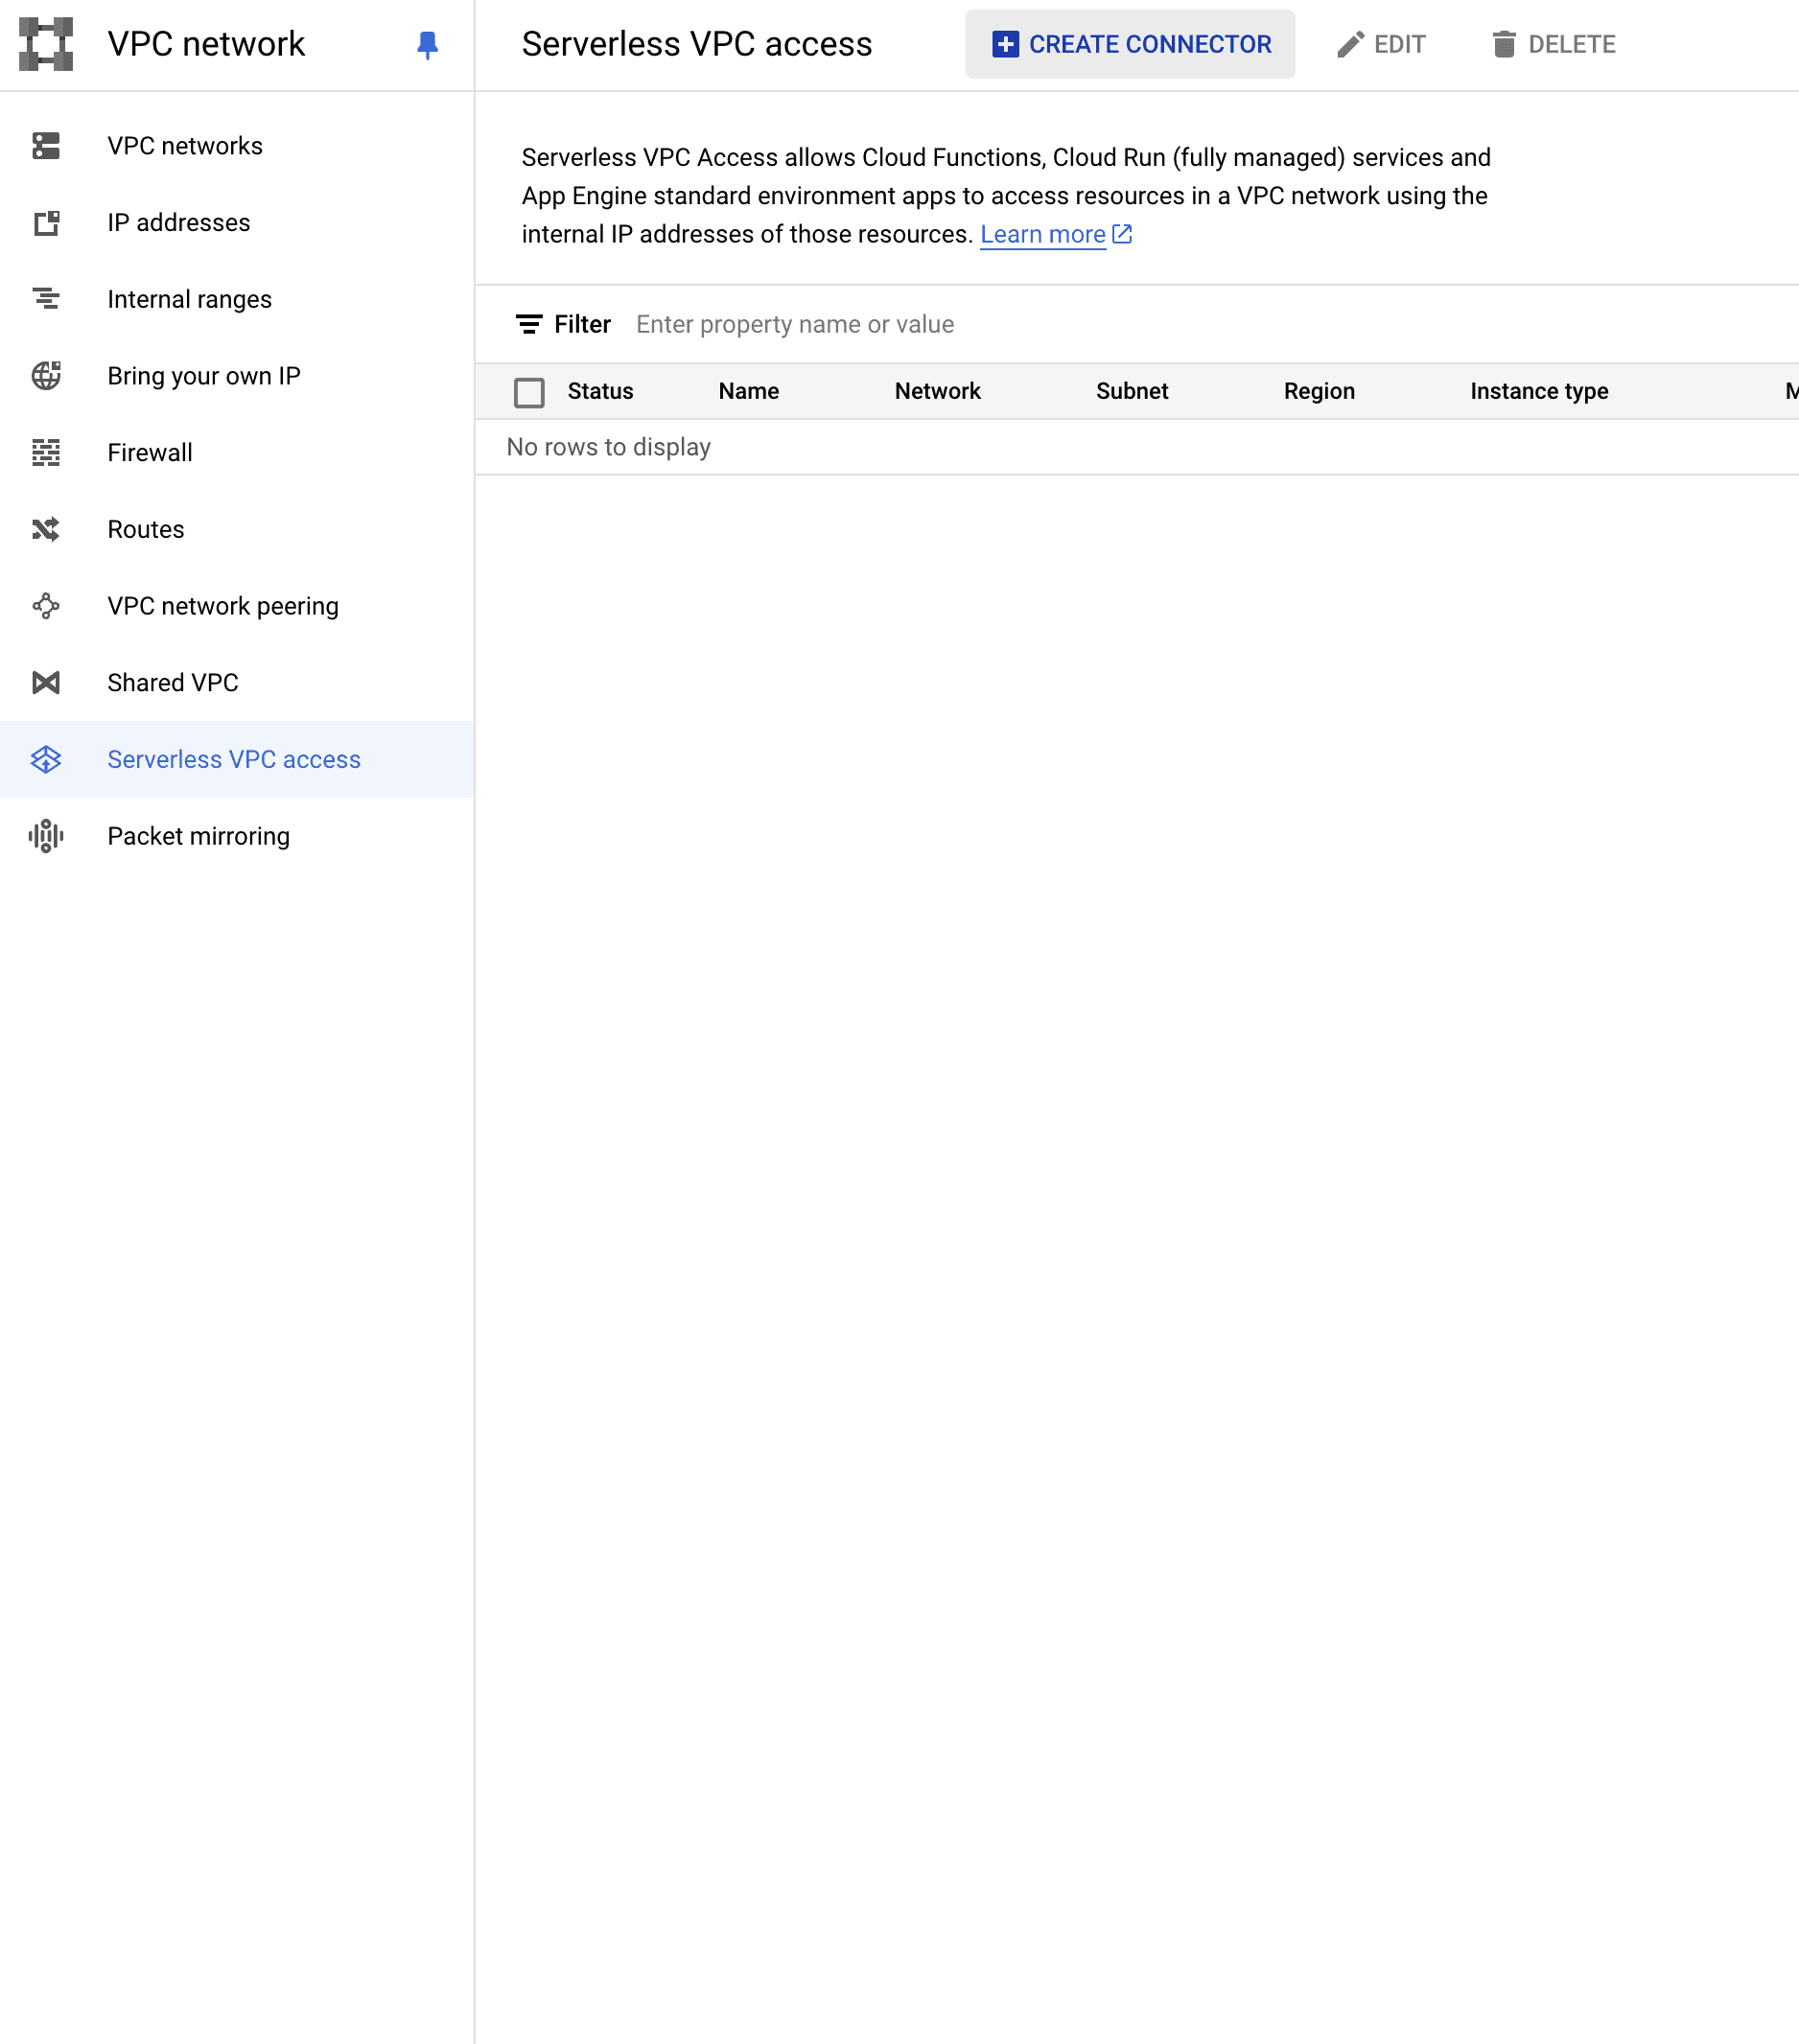
- Go to "Serverless VPC access" and click "Create Connector".
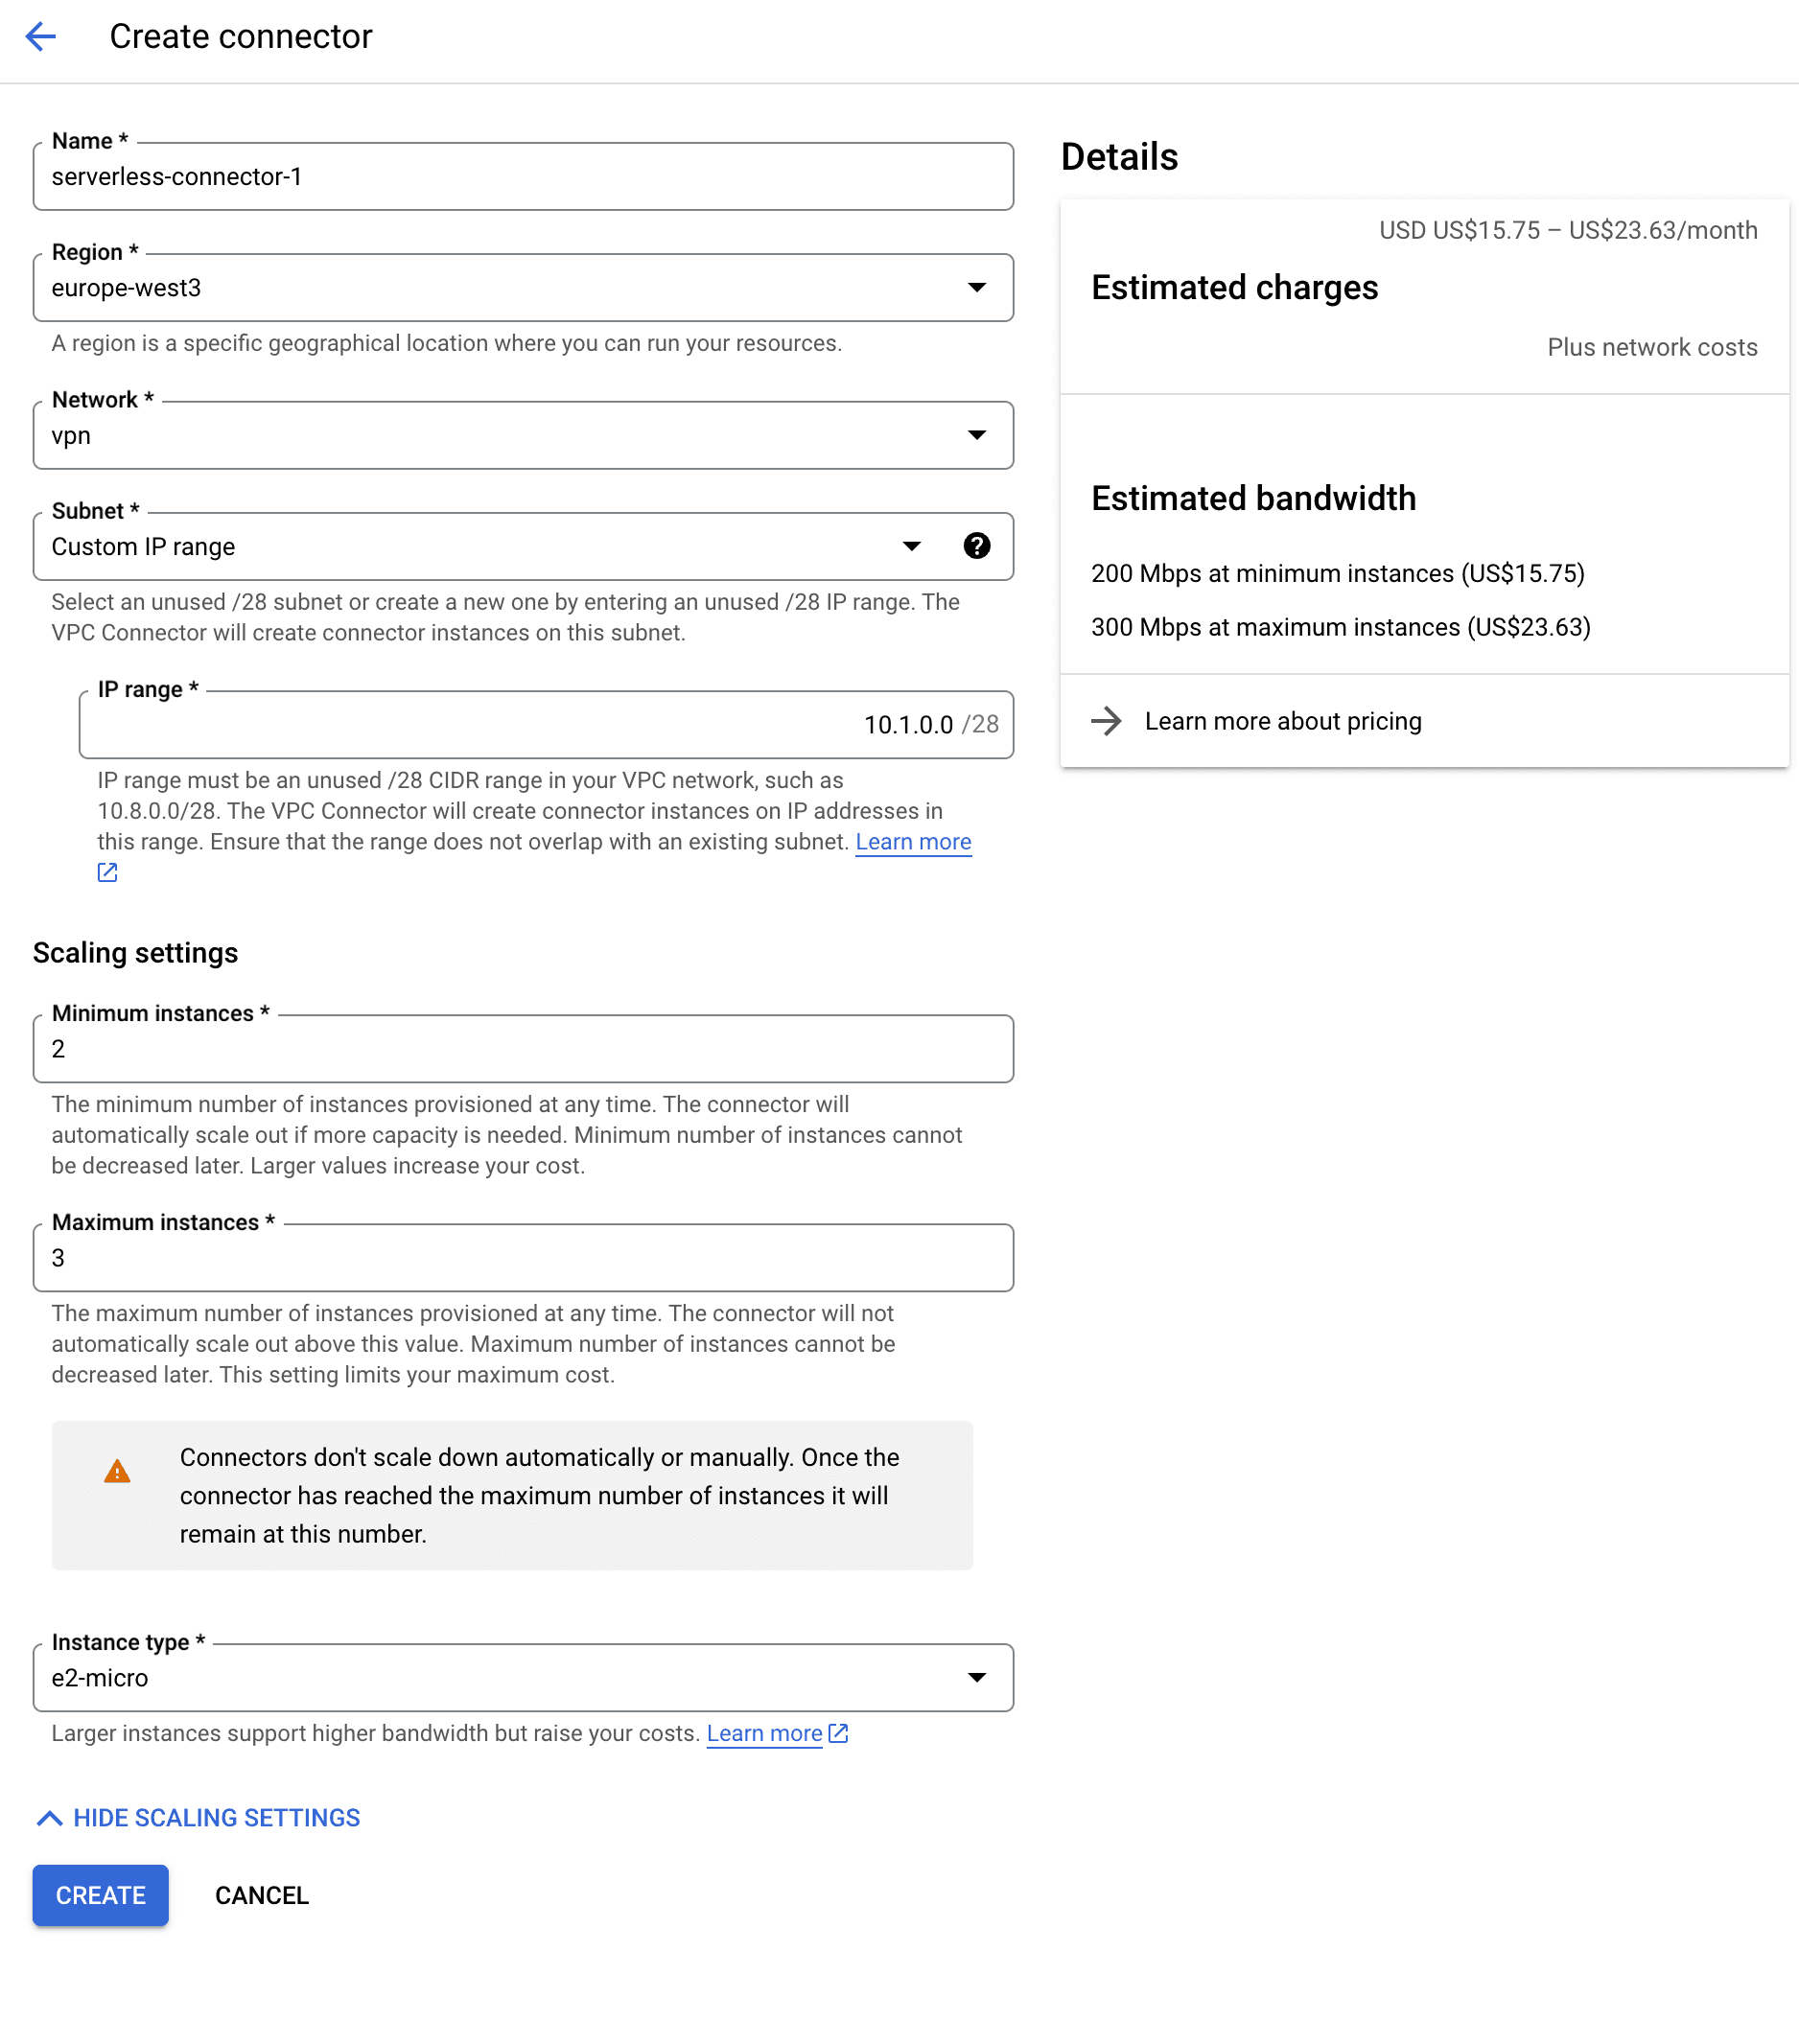
- Name the connector as you please. We used
serverless-connector-1. - Select the region of your VPC's subnet. We used
europe-west3. - Select the VPC we created before,
vpn. - We're going to select "Custom IP range" and set it to
10.1.0.0/28. - We're going to ignore the rest of the settings.
Note
If you are using a Serverless VPC Connector, you'll need to add its IP range (in this case 10.1.0.0/28) to the Cloud VPN Tunnel's configuration, under "Remote network IP ranges".
You cannot change this setting after the tunnel has been created, so you'll either need to:
- Create the VPC Connector before you set up the VPN Tunnel, or
- remove the VPN Tunnel and create it again, adding all the necessary IP ranges.
If you do not add it there, your serverless resources will not be able to access the on-premises resources!
Once you've configured the Serverless VPC Access connector, note its internal IP range.
You'll have to add it to the IPSec's configuration file to the rightsubnet property, like this:
config setup
    protostack=netkey

conn mysubnet
     also=mytunnel
     leftsubnet=10.106.0.0/20 # IP range of *this* subnet (e.g. 10.108.0.0/20)
     rightsubnet=10.0.0.0/24,10.1.0.0/28 # " of GCP's subnet (e.g. 10.0.0.0/24) **THE SECOND RANGE IS FOR THE VPC CONNECTOR **
     auto=start

conn mytunnel
    left=46.101.12.37 # the external IP of *on-premises* server
    right=34.159.28.88 # the external IP of GCP's Cloud VPN Gateway
    authby=secret
Then restart the IPSec server with:
sudo ipsec restartConfigure Cloud Function(s)
Ok, so you have a Serverless VPC Connector running. Now, we'll need to tell our cloud function(s) to use it.
We need to configure each cloud function to use the connector as described here.
So just create a cloud function (gen1) and attach it to your VPC Connector.
And as for the code, we can start with something like this (gen1):
/**
* Responds to any HTTP request.
*
* @param {!express:Request} req HTTP request context.
* @param {!express:Response} res HTTP response context.
*/
exports.helloWorld = async (req, res) => {
	const url = 'http://10.106.0.2:3000'; // Use the actual internal IP address of the on-premises server

	try {
		const response = await fetch(url);
		const data = await response.text();
		console.log('Response:', data);
		res.status(200).send(data);
	} catch (error) {
		console.error('Error:', error.message);
		res.status(500).send(error.message);
	}
};
After deployment we can test it to see if everything is working:
curl -m 70 -X POST https://<regiona-and-your-project-id>.cloudfunctions.net/function-w-connector-2 \
-H "Authorization: bearer $(gcloud auth print-identity-token)" \
-H "Content-Type: application/json" \
-d '{
    "message": "Hello World"
}'
This was also done: https://cloud.google.com/vpc/docs/configure-serverless-vpc-access#restrict-access
Top tip
Ideally, you'll want to configure your on-premises server so that traffic coming through the VPN tunnel is allowed, but other unswished connections should be blocked by your Firewall. We are not going to cover this part in this tutorial.
A similar approach can be followed if you are using App Engine.
Configuring Cloud Run
You might not need to setup a serverless VPC Conenctor. You can configure a direct VPC access as described here.
Conclusion
In this tutorial, we've explored how to establish a secure connection between Google Cloud Platform (GCP) and an on-premises network using Cloud VPN.
This setup allows for seamless and secure communication between cloud-based resources and on-premises infrastructure, enabling hybrid cloud architectures and extending the reach of cloud services to your local network.
By following this guide, you've learned how to:
- Enhance security by creating an encrypted tunnel between GCP and your on-premises network
- Enable cloud resources to access on-premises services
- Utilize Serverless VPC Access to connect serverless components like Cloud Functions to your VPC network
Remember, while this tutorial provides a solid foundation, there are additional considerations for a production environment, such as:
- Implementing proper firewall rules on both the GCP and on-premises sides
- Setting up monitoring and logging for the VPN connection
- Considering high availability configurations with multiple tunnels
- Regularly reviewing and updating security policies
By mastering these concepts, you're well-equipped to build robust, secure, and flexible hybrid cloud solutions that leverage the best of both cloud and on-premises environments.
Stay tuned for more!